

UnoCSS
The instant on-demand atomic CSS engine.
README
![]()
UnoCSS
The instant on-demand Atomic CSS engine.

💡 I highly recommend reading this blog post -
Reimagine Atomic CSS
for the story behind
🧑💻 Interactive Docs Beta |🤹♂️ Playground
Features
- Fully customizable - no core utilities, all functionalities are provided via presets.
- No parsing, no AST, no scanning, it's INSTANT (5x faster than Windi CSS or Tailwind JIT).
- ~6kb min+brotli - zero deps and browser friendly.
- Shortcuts - aliasing utilities, dynamically.
- Attributify mode - group utilities in attributes.
- Pure CSS Icons - use any icon as a single class.
- Variant Groups - shorthand for group utils with common prefixes.
- CSS Directives - reuse utils in CSS with@apply directive.
- Compilation mode - synthesizes multiple classes into one at build time.
- Inspector - inspect and debug interactively.
- CSS-in-JS Runtime build - use UnoCSS with one line of CDN import.
- Code-splitting for CSS - ships minimal CSS for MPA.
Installation
- Vite
- Nuxt
- Astro
- Webpack
- CLI
Configurations
UnoCSS is an atomic-CSS engine instead of a framework. Everything is designed with flexibility and performance in mind. There are no core utilities in UnoCSS, all functionalities are provided via presets.
By default, UnoCSS applies the default preset, which provides a common superset of the popular utilities-first frameworks Tailwind CSS, Windi CSS, Bootstrap, Tachyons, etc.
Presets
Presets are the heart of UnoCSS. They let you make your own custom framework in minutes.
Official Presets
- @unocss/preset-uno - The default preset (right now it's equivalent to@unocss/preset-wind).
- @unocss/preset-mini - The minimal but essential rules and variants.
- @unocss/preset-wind - Tailwind / Windi CSS compact preset.
- @unocss/preset-attributify - Provides Attributify Mode to other presets and rules.
- @unocss/preset-icons - Use any icon as a class utility.
- @unocss/preset-web-fonts - Web fonts at ease.
- @unocss/preset-typography - The typography preset.
- @unocss/preset-tagify - Tagify Mode for UnoCSS.
- @unocss/preset-rem-to-px - Converts rem to px for utils.
Community Presets
- unocss-preset-scalpel - Scalpel Preset by @macheteHot.
- unocss-preset-chroma - Gradient Preset by @chu121su12.
- unocss-preset-scrollbar - Scrollbar Preset by @action-hong.
- unocss-applet - Using UnoCSS in applet (UniApp / Taro) by @zguolee.
- unocss-preset-daisy - daisyUI Preset by @kidonng.
- unocss-preset-primitives - Like headlessui-tailwindcss , radix-ui , custom for UnoCSS By @zirbest.
- unocss-preset-theme - Preset for automatic theme switching by @Dunqing
Community Frameworks
- Anu - DX focused utility based vue component library by @jd-solanki
Using Presets
To set presets to your project:
- ```ts
- // vite.config.ts
- import Unocss from 'unocss/vite'
- import { presetAttributify, presetUno } from 'unocss'
- export default {
- plugins: [
- Unocss({
- presets: [
- presetAttributify({ /* preset options */}),
- presetUno(),
- // ...custom presets
- ],
- }),
- ],
- }
- ```
When the presets option is specified, the default preset will be ignored.
To disable the default preset, you can set presets to an empty array:
- ```ts
- // vite.config.ts
- import Unocss from 'unocss/vite'
- export default {
- plugins: [
- Unocss({
- presets: [], // disable default preset
- rules: [
- // your custom rules
- ],
- }),
- ],
- }
- ```
Custom Rules
Static Rules
Writing custom rules for UnoCSS is super easy. For example:
- ```ts
- rules: [
- ['m-1', { margin: '0.25rem' }],
- ]
- ```
You will have the following CSS generated whenever m-1 is detected in users' codebase:
- ```css
- .m-1 { margin: 0.25rem; }
- ```
Dynamic Rules
To make it smarter, change the matcher to a RegExp and the body to a function:
- ```ts
- rules: [
- [/^m-(\d+)$/, ([, d]) => ({ margin: `${d / 4}rem` })],
- [/^p-(\d+)$/, match => ({ padding: `${match[1] / 4}rem` })],
- ]
- ```
The first argument of the body function is the match result, you can destructure it to get the matched groups.
For example, with the following usage:
- ``` html
- <div class="m-100">
- <button class="m-3">
- <icon class="p-5" />
- My Button
- </button>
- </div>
- ```
the corresponding CSS will be generated:
- ```css
- .m-100 { margin: 25rem; }
- .m-3 { margin: 0.75rem; }
- .p-5 { padding: 1.25rem; }
- ```
Congratulations! Now you got your own powerful atomic CSS utilities, enjoy!
Full Controlled Rules
This is an advanced feature, you don't need it in most of the cases.
When you really need some advanced rules that can't be covered by the combination of Dynamic Rules and Variants, we also provide a way to give you full control to generate the CSS.
By returning a string from the dynamic rule's body function, it will be directly passed to the generated CSS. That also means you would need to take care of things like CSS escaping, variants applying, CSS constructing, and so on.
- ```ts
- import Unocss, { toEscapedSelector as e } from 'unocss'
- Unocss({
- rules: [
- [/^custom-(.+)$/, ([, name], { rawSelector, currentSelector, variantHandlers, theme }) => {
- // discard mismatched rules
- if (name.includes('something'))
- return
- // if you want, you can disable the variants for this rule
- if (variantHandlers.length)
- return
- const selector = e(rawSelector)
- // return a string instead of an object
- return `
- ${selector} {
- font-size: ${theme.fontSize.sm};
- }
- /* you can have multiple rules */
- ${selector}::after {
- content: 'after';
- }
- .foo > ${selector} {
- color: red;
- }
- /* or media queries */
- @media (min-width: ${theme.breakpoints.sm}) {
- ${selector} {
- font-size: ${theme.fontSize.sm};
- }
- }
- `
- }],
- ],
- })
- ```
You might need to read some code to take the full power of it.
Ordering
UnoCSS respects the order of the rules you defined in the generated CSS. Latter ones come with higher priority.
Shortcuts
The shortcuts functionality that UnoCSS provides is similar to Windi CSS's one
- ```ts
- shortcuts: {
- // shortcuts to multiple utilities
- 'btn': 'py-2 px-4 font-semibold rounded-lg shadow-md',
- 'btn-green': 'text-white bg-green-500 hover:bg-green-700',
- // single utility alias
- 'red': 'text-red-100'
- }
- ```
In addition to the plain mapping, UnoCSS also allows you to define dynamic shortcuts.
Similar to Rules, a dynamic shortcut is the combination of a matcher RegExp and a handler function.
- ```ts
- shortcuts: [
- // you could still have object style
- {
- btn: 'py-2 px-4 font-semibold rounded-lg shadow-md',
- },
- // dynamic shortcuts
- [/^btn-(.*)$/, ([, c]) => `bg-${c}-400 text-${c}-100 py-2 px-4 rounded-lg`],
- ]
- ```
With this, we could use btn-green and btn-red to generate the following CSS:
- ```css
- .btn-green {
- padding-top: 0.5rem;
- padding-bottom: 0.5rem;
- padding-left: 1rem;
- padding-right: 1rem;
- --un-bg-opacity: 1;
- background-color: rgba(74, 222, 128, var(--un-bg-opacity));
- border-radius: 0.5rem;
- --un-text-opacity: 1;
- color: rgba(220, 252, 231, var(--un-text-opacity));
- }
- .btn-red {
- padding-top: 0.5rem;
- padding-bottom: 0.5rem;
- padding-left: 1rem;
- padding-right: 1rem;
- --un-bg-opacity: 1;
- background-color: rgba(248, 113, 113, var(--un-bg-opacity));
- border-radius: 0.5rem;
- --un-text-opacity: 1;
- color: rgba(254, 226, 226, var(--un-text-opacity));
- }
- ```
Rules Merging
By default, UnoCSS will merge CSS rules with the same body to minimize the CSS size.
` will generate
- ```css
- .hover\:m2:hover, .m-2 { margin: 0.5rem; }
- ```
instead of two separate rules:
- ```css
- .hover\:m2:hover { margin: 0.5rem; }
- .m-2 { margin: 0.5rem; }
- ```
Style Resetting
UnoCSS does not provide style resetting or preflight by default for maximum flexibility and does not populate your global CSS. If you use UnoCSS along with other CSS frameworks, they probably already do the resetting for you. If you use UnoCSS alone, you can use resetting libraries like Normalize.css.
We also provide a small collection for you to grab them quickly:
- ``` sh
- npm i @unocss/reset
- ```
- ```ts
- // main.js
- // pick one of the following
- // normalize.css
- import '@unocss/reset/normalize.css'
- // reset.css by Eric Meyer https://meyerweb.com/eric/tools/css/reset/index.html
- import '@unocss/reset/eric-meyer.css'
- // preflights from tailwind
- import '@unocss/reset/tailwind.css'
- ```
Learn more at @unocss/reset.
Preflight
You can inject raw css as preflights from the configuration. The resolved theme is available to customize the css.
- ```ts
- preflights: [
- {
- getCSS: ({ theme }) => `
- * {
- color: ${theme.colors.gray?.[700] ?? '#333'};
- padding: 0;
- margin: 0;
- }
- `
- }
- ]
- ```
Custom Variants
Variants allows you to apply some variations to your existing rules. For example, to implement thehover: variant from Tailwind:
- ```ts
- variants: [
- // hover:
- (matcher) => {
- if (!matcher.startsWith('hover:'))
- return matcher
- return {
- // slice `hover:` prefix and passed to the next variants and rules
- matcher: matcher.slice(6),
- selector: s => `${s}:hover`,
- }
- }
- ],
- rules: [
- [/^m-(\d)$/, ([, d]) => ({ margin: `${d / 4}rem` })],
- ]
- ```
- matcher controls when the variant is enabled. If the return value is a string, it will be used as the selector for matching the rules.
- selector provides the availability of customizing the generated CSS selector.
Let's have a tour of what happened when matching for hover:m-2:
- hover:m-2 is extracted from users usages
- hover:m-2 send to all variants for matching
- hover:m-2 is matched by our variant and returns m-2
- the result m-2 will be used for the next round of variants matching
- if no other variant is matched, m-2 will then goes to match the rules
- our first rule get matched and generates .m-2 { margin: 0.5rem; }
- finally, we apply our variants' transformation to the generated CSS. In this case, we prepended :hover to the selector hook
As a result, the following CSS will be generated:
- ```css
- .hover\:m-2:hover { margin: 0.5rem; }
- ```
With this, we could have m-2 applied only when users hover over the element.
The variant system is very powerful and can't be covered fully in this guide, you can check the default preset's implementation to see more advanced usages.
Extend Theme
UnoCSS also supports the theming system that you might be familiar with in Tailwind / Windi. At the user level, you can specify the theme property in your config, and it will be deep merged to the default theme.
- ```ts
- theme: {
- // ...
- colors: {
- 'veryCool': '#0000ff', // class="text-very-cool"
- 'brand': {
- 'primary': 'hsla(var(--hue, 217), 78%, 51%)', //class="bg-brand-primary"
- }
- },
- }
- ```
To consume the theme in rules:
- ```ts
- rules: [
- [/^text-(.*)$/, ([, c], { theme }) => {
- if (theme.colors[c])
- return { color: theme.colors[c] }
- }],
- ]
- ```
One exception is that UnoCSS gives full control of breakpoints to users. When a custom breakpoints is provided, the default will be overridden instead of merging. For example:
- ```ts
- theme: {
- // ...
- breakpoints: {
- sm: '320px',
- md: '640px',
- },
- }
- ```
Right now, you can only use the sm: and md: breakpoint variants.
verticalBreakpoints is same as breakpoints but for vertical layout.
Layers
The order of CSS will affect their priorities. While we will retain the order of rules, sometimes you may want to group some utilities to have more explicit control of their order.
Unlike Tailwind, which offers 3 fixed layers (base, components, utilities), UnoCSS allows you to define the layers as you want. To set the layer, you can pass the metadata as the third item of your rules:
- ```ts
- rules: [
- [/^m-(\d)$/, ([, d]) => ({ margin: `${d / 4}rem` }), { layer: 'utilities' }],
- // when you omit the layer, it will be `default`
- ['btn', { padding: '4px' }],
- ]
- ```
This will generate:
- ```css
- /* layer: default */
- .btn { padding: 4px; }
- /* layer: utilities */
- .m-2 { margin: 0.5rem; }
- ```
Layering also can be set on each preflight:
- ```ts
- preflights: [
- {
- layer: 'my-layer',
- getCSS: async () => (await fetch('my-style.css')).text(),
- },
- ]
- ```
You can control the order of layers by:
- ```ts
- layers: {
- components: -1,
- default: 1,
- utilities: 2,
- 'my-layer': 3,
- }
- ```
Layers without specified order will be sorted alphabetically.
When you want to have your custom CSS between layers, you can update your entry module:
- ```ts
- // 'uno:[layer-name].css'
- import 'uno:components.css'
- // layers that are not 'components' and 'utilities' will fallback to here
- import 'uno.css'
- // your own CSS
- import './my-custom.css'
- // "utilities" layer will have the highest priority
- import 'uno:utilities.css'
- ```
Utilities Preprocess & Prefixing
UnoCSS also provides the ability to preprocess and transform extracted utilities before processing to the matcher. For example, the following example allows you to add a global prefix to all utilities:
- ```ts
- preprocess(matcher) {
- return matcher.startsWith('prefix-')
- ? matcher.slice(7)
- : undefined // ignore
- }
- ```
Scanning
Please note that UnoCSS works at build time, meaning only statically presented utilities will be generated and shipped to your app. Utilities that used dynamically or fetched from external resources at runtime might not be applied.
By default, UnoCSS will extract the utilities usage from files in your build pipeline with extension .jsx, .tsx, .vue, .md, .html, .svelte, .astro. And then generate the CSS on demand.
.js and .ts files are NOT included by default. You can add @unocss-include, per-file basis, anywhere in the file that you want UnoCSS to scan, or add `.js or .ts in the configuration to include all js/ts files as scan targets. Similarly, you can also add @unocss-ignore` to bypass the scanning and transforming for a file.
Safelist
Sometimes you might want have to use dynamic concatenations like:
- ``` html
- <div class="p-${size}"></div>
- ```
Due the fact that UnoCSS works in build time using static extracting, at the compile time we can't possibility know all the combination of the utilities. For that, you can configure the safelist option.
- ```ts
- safelist: 'p-1 p-2 p-3 p-4'.split(' ')
- ```
the corresponding CSS will always be generated:
- ```css
- .p-1 { padding: 0.25rem; }
- .p-2 { padding: 0.5rem; }
- .p-3 { padding: 0.75rem; }
- .p-4 { padding: 1rem; }
- ```
Or more flexible:
- ```ts
- safelist: [
- ...Array.from({ length: 4 }, (_, i) => `p-${i + 1}`),
- ]
- ```
If you are seaking for the true dynamic generation at the runtime, you may check the @unocss/runtime package.
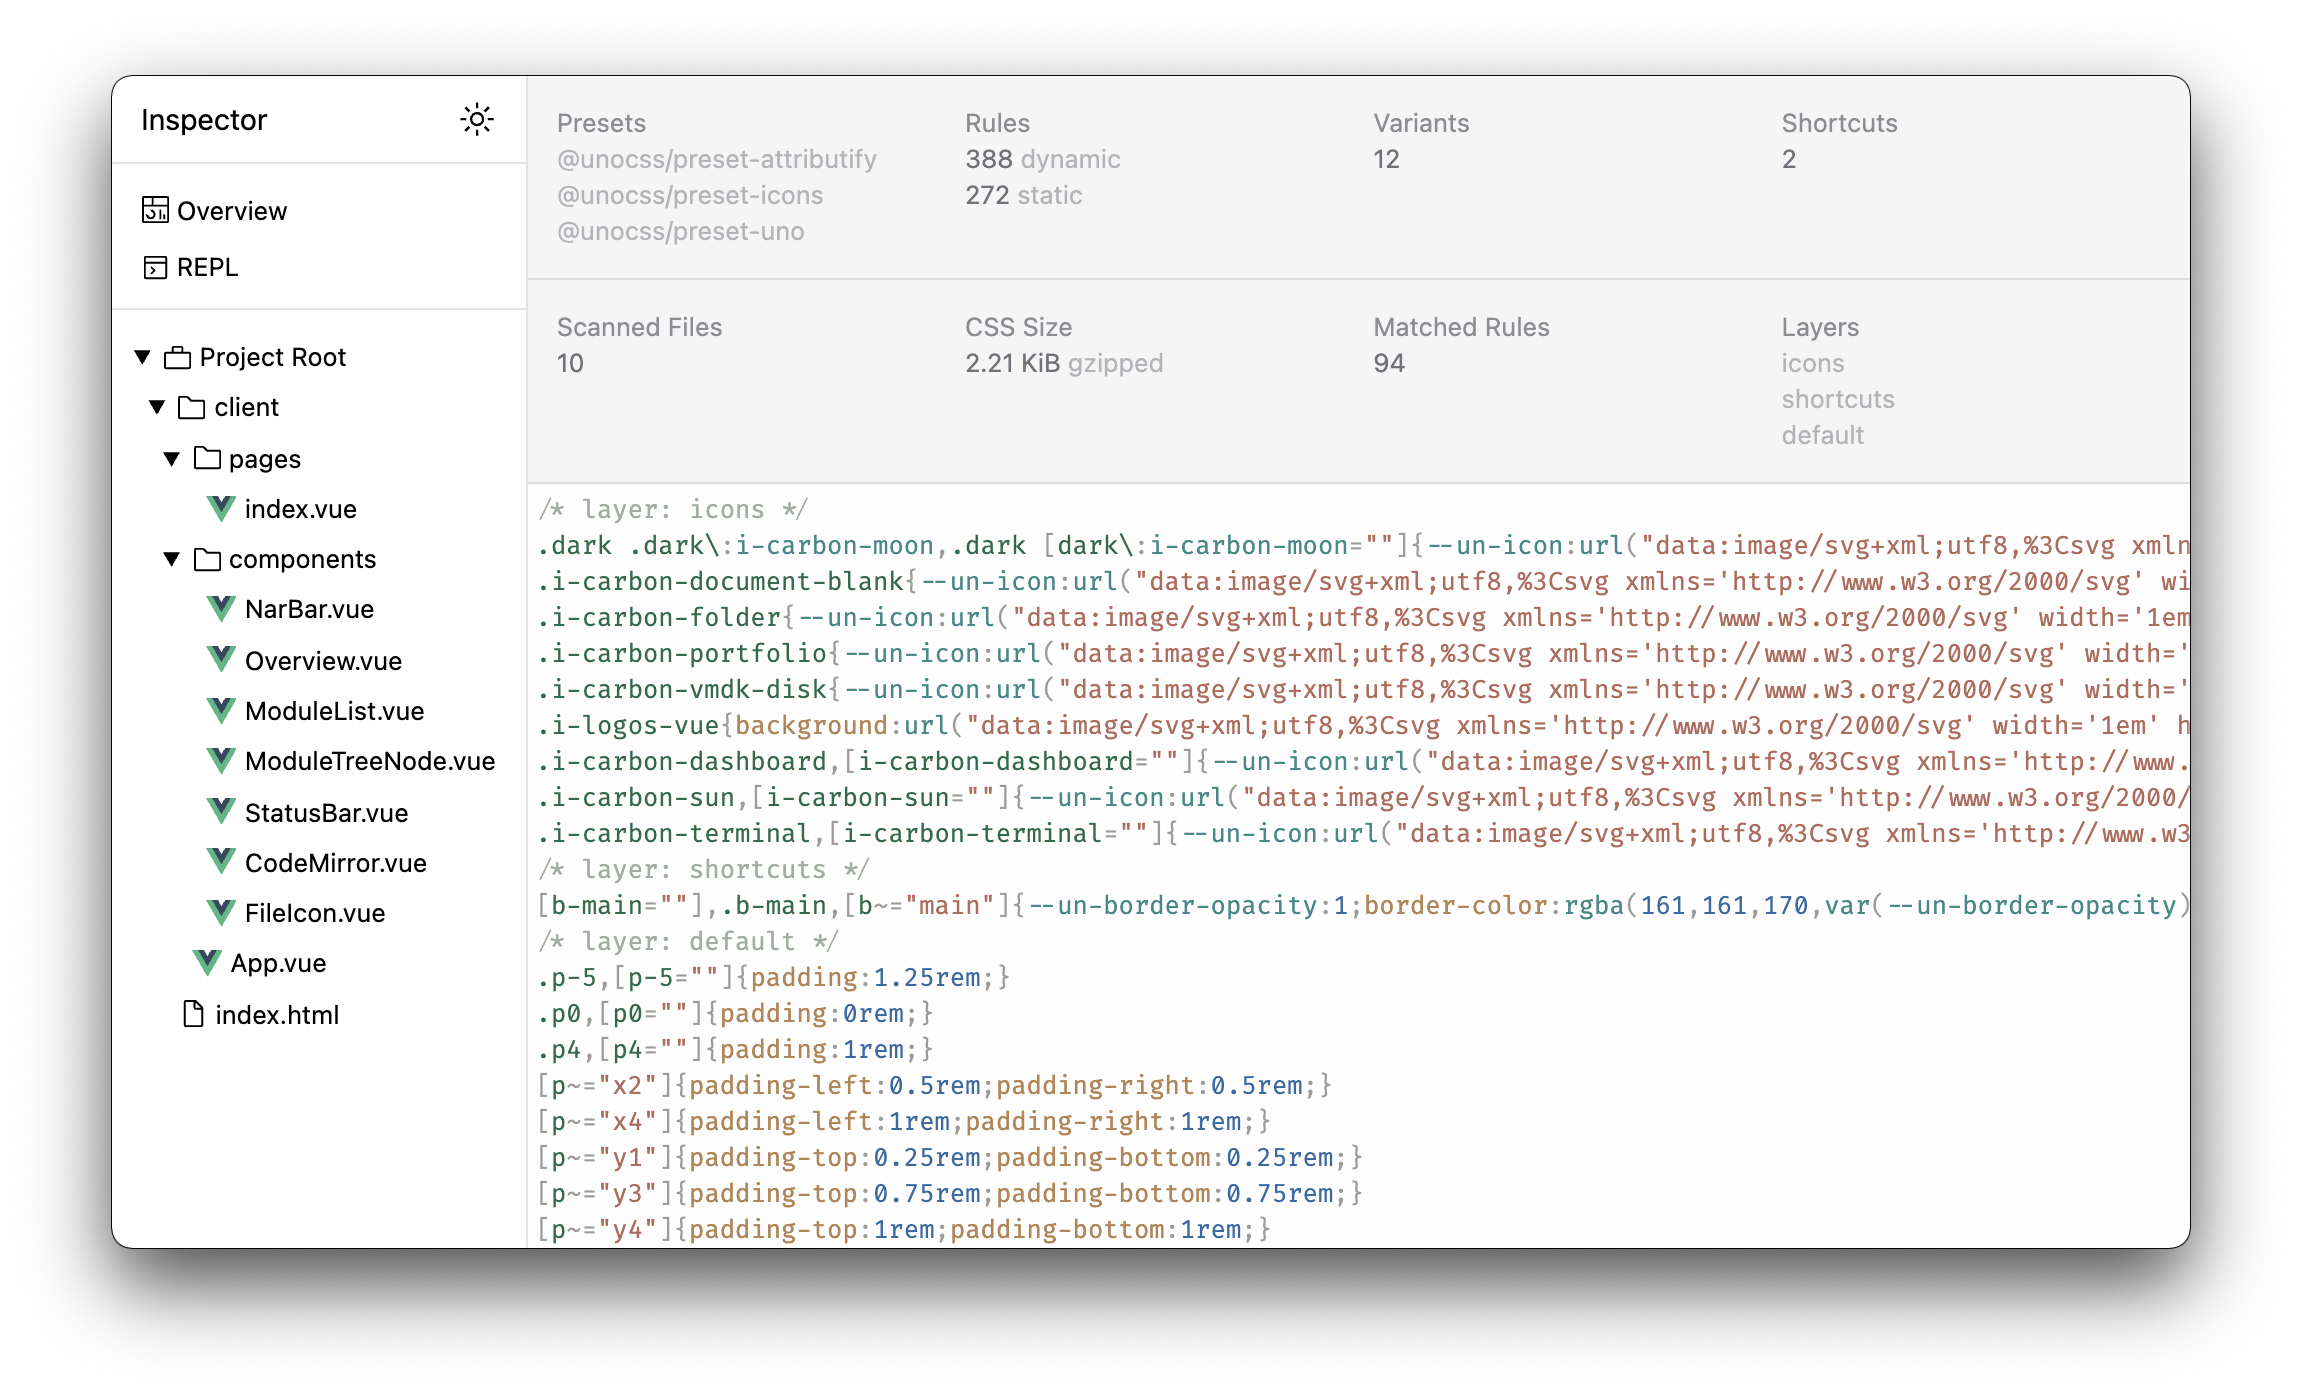
Inspector
From v0.7.0, our Vite plugin now ships with a dev inspector (@unocss/inspector) for you to view, play and analyse your custom rules and setup. Visithttp://localhost:3000/__unocss in your Vite dev server to see it.
Runtime (CSS-in-JS)
See @unocss/runtime
Acknowledgement
in alphabet order
- ACSS
- Tachyons
- Twind
Sponsors

License
MIT License © 2021-PRESENT Anthony Fu
为什么是最好的 GitHub 项目?
技术的发展速度比以往任何时候都快,技术正在全速创新。几乎每天都会发布惊人的开源项目。
如何快速检查真正重要的项目,现在而不是 6 个月前?
探客时代每天拍摄 GitHub stars 的 “快照”,以获得 2000 多个项目的精选列表,以检测过去几个月的趋势。
我们不会扫描 GitHub 上的所有现有项目,而是根据我们的经验和我们在 Internet 上阅读的内容,专注于我们发现 “有趣” 的精选项目列表。想要了解的项目可以提交给我们。
关注公众号
