

OpenNext
Open source Next.js serverless adapter
README
open-next
OpenNext takes the Next.js build output and converts it into a package that can be deployed to any functions as a service platform.
Features
OpenNext aims to support all Next.js 13 features. Some features are work in progress. Please open a new issue to let us know!
- [x] App & Pages Router
- [x] API routes
- [x] Dynamic routes
- [x] Static site generation (SSG)
- [x] Server-side rendering (SSR)
- [x] Middleware
- [x] Image optimization
- [x] NextAuth.js
- [x] Running at edge
- [x] No cold start
Who is using OpenNext?
How does OpenNext work?
When calling open-next build, OpenNext runs next build to build the Next.js app, and then transforms the build output to a format that can be deployed to AWS.
Building the Next.js app
OpenNext runs the build script in your package.json file. Depending on the lock file found in the app, the corresponding packager manager will be used. Either npm run build, yarn build, or pnpm build will be run. For more on customizing the build command, see overriding the build command.
Transforming the build output
The build output is then transformed into a format that can be deployed to AWS. The transformed output is generated inside the .open-next folder within your Next.js app. Files in assets/ are ready to be uploaded to AWS S3. And the function code is wrapped inside Lambda handlers, ready to be deployed to AWS Lambda or Lambda@Edge.
- ```bash
- my-next-app/
- .open-next/
- cache/ -> ISR cache files to upload to an S3 Bucket
- assets/ -> Static files to upload to an S3 Bucket
- server-function/ -> Handler code for server Lambda Function
- revalidation-function/ -> Handler code for revalidation Lambda Function
- image-optimization-function/ -> Handler code for image optimization Lambda Function
- warmer-function/ -> Cron job code to keep server function warm
- ```
Deployment
OpenNext allows you to deploy your Next.js apps using a growing list of frameworks.
SST
The easiest way to deploy OpenNext to AWS is with SST. This is maintained by the OpenNext team and only requires three simple steps:
1. Run npx create-sst@latest in your Next.js app
2. Run npm install
3. Deploy to AWS npx sst deploy
For more information, check out the SST docs: https://docs.sst.dev/start/nextjs
Other Frameworks
The OpenNext community has contributed deployment options for a few other frameworks.
- CDK (TS): https://github.com/jetbridge/cdk-nextjs
- CDK (TS, Java, Go, Py, .NET): https://github.com/datasprayio/open-next-cdk
- CloudFormation: https://github.com/serverless-stack/open-next/issues/32
- Serverless Framework: https://github.com/serverless-stack/open-next/issues/32
- Terraform: https://github.com/RJPearson94/terraform-aws-open-next
- Terraform: https://github.com/nhs-england-tools/terraform-aws-opennext#diagrams
To use these, you'll need to run the following inside your Next.js app.
- ```bash
- $ npx open-next@latest build
- ```
If you are using OpenNext to deploy using a framework that is not listed here, please let us know so we can add it to the list.
Recommended infrastructure on AWS
OpenNext does not create the underlying infrastructure. You can create the infrastructure for your app with your preferred tool — SST, AWS CDK, Terraform, Serverless Framework, etc.
This is the recommended setup.
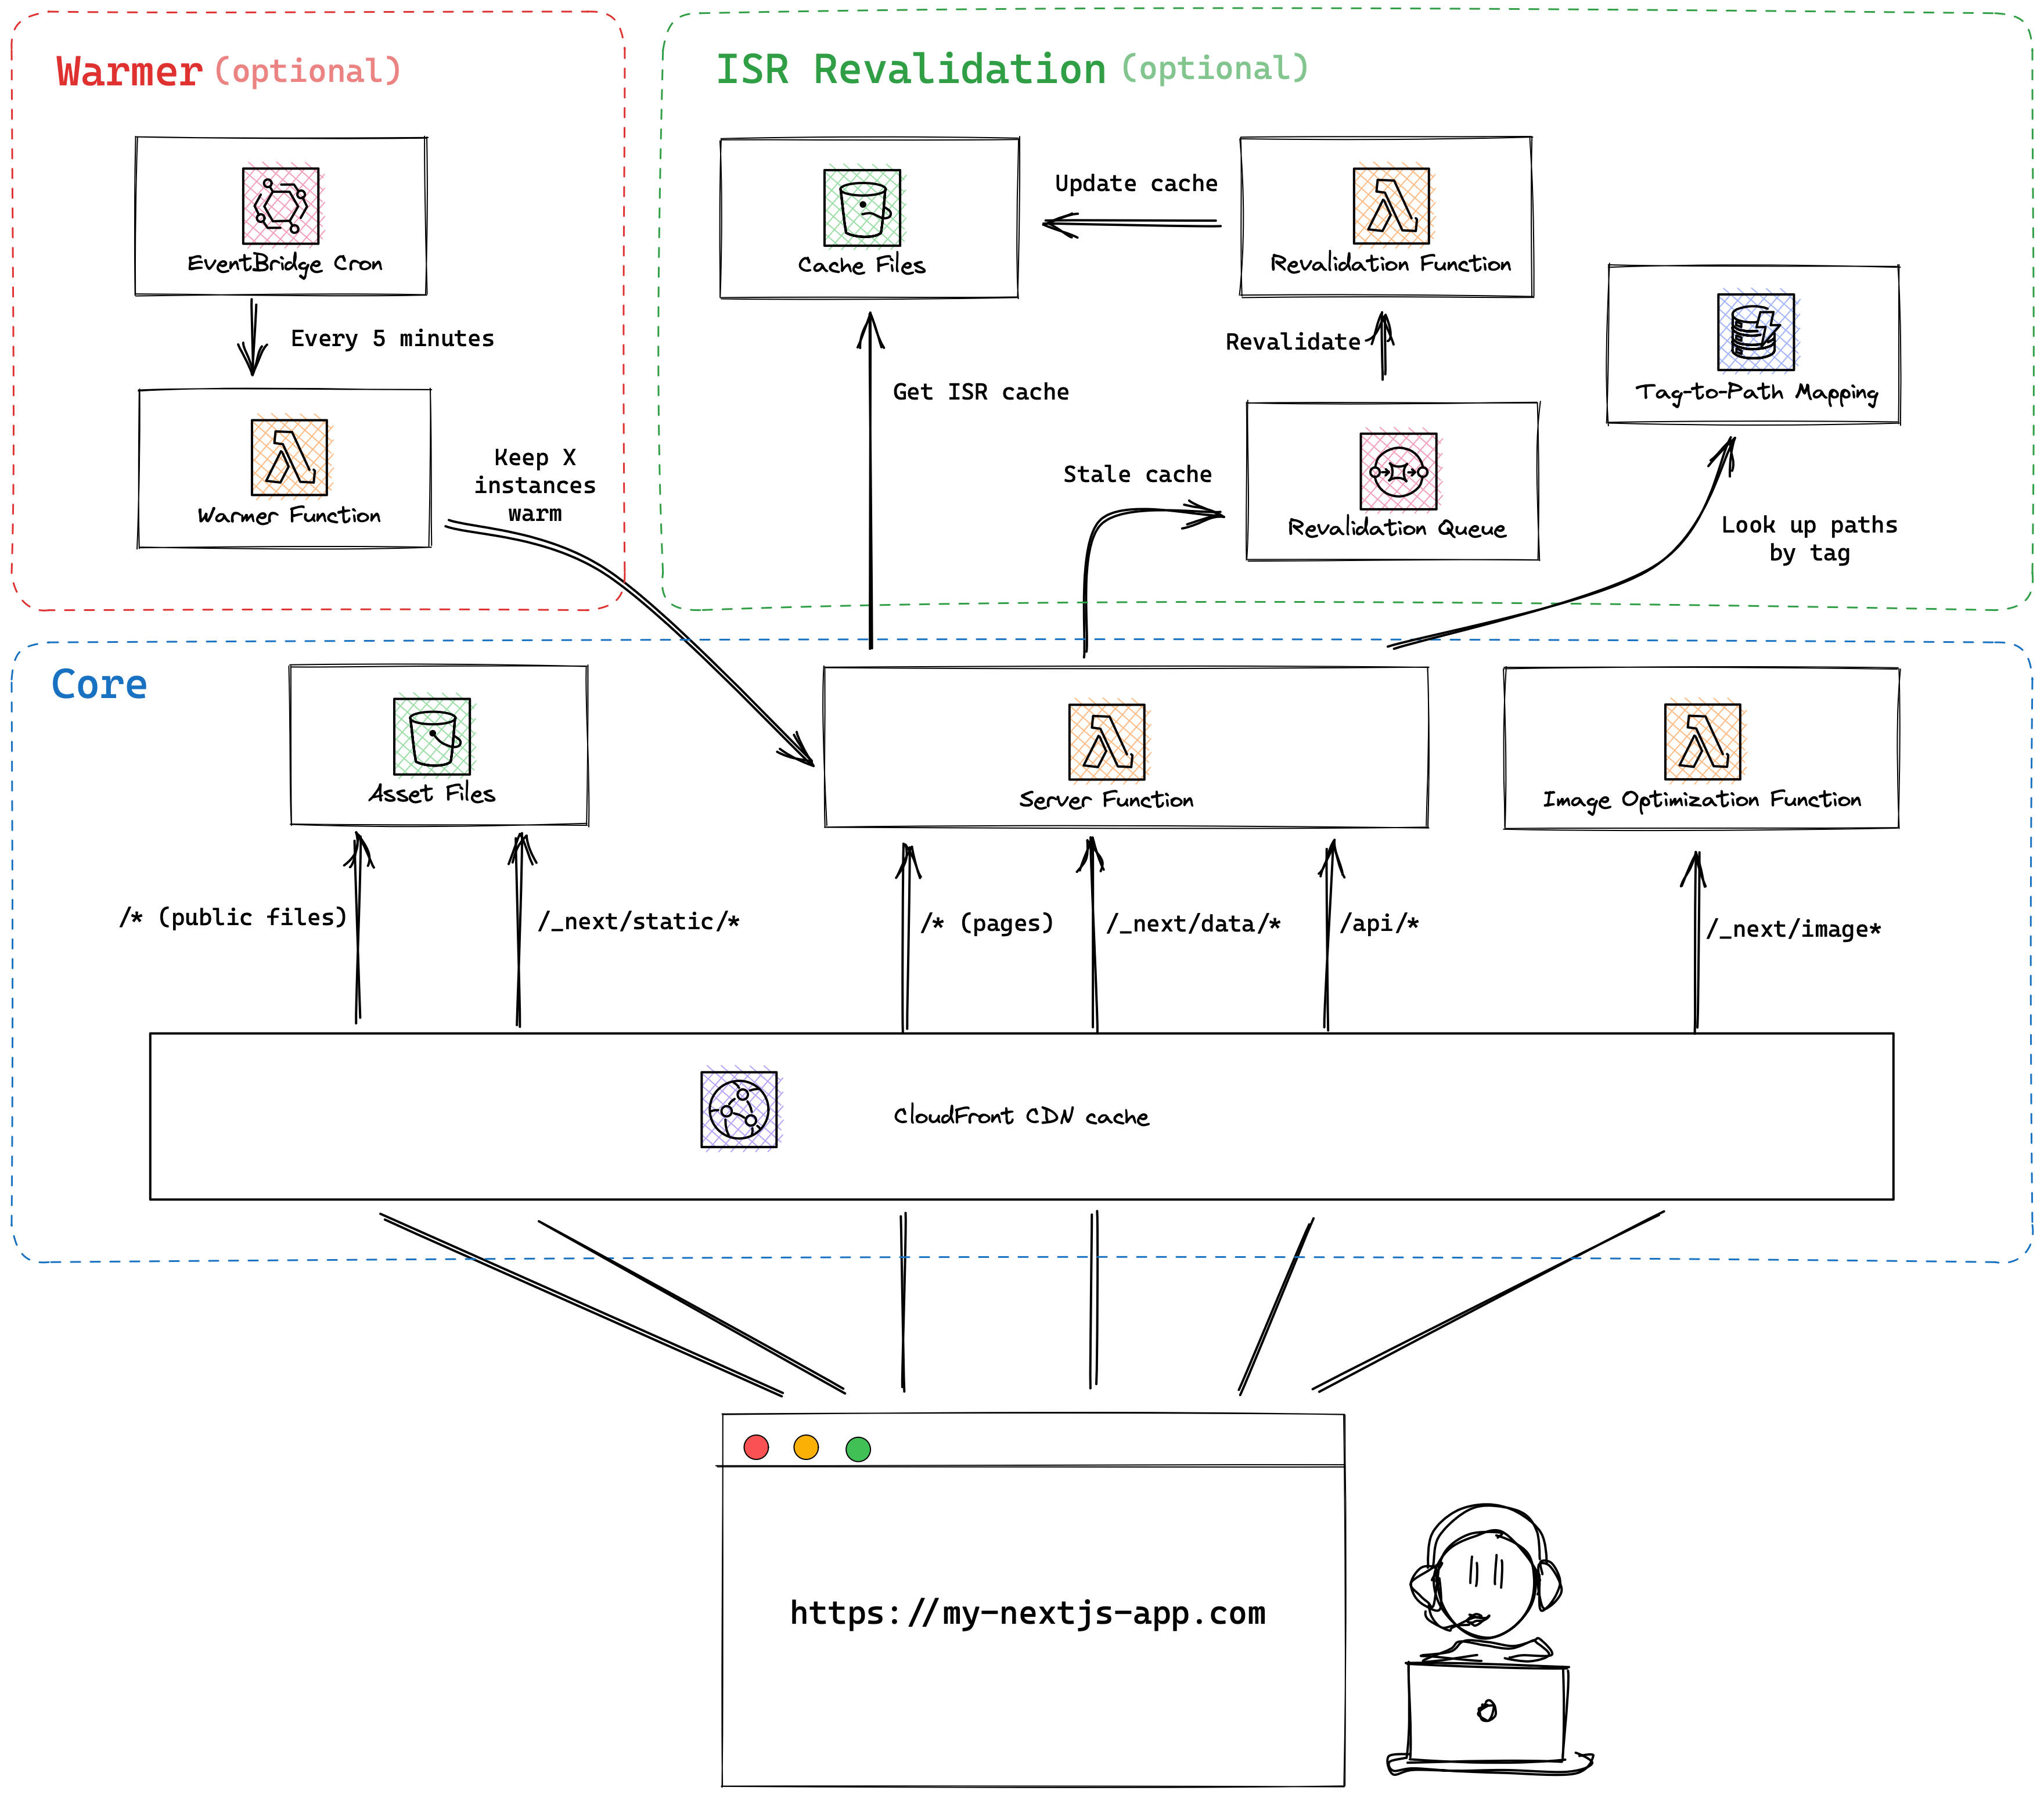
Here are the recommended configurations for each AWS resource.
Asset files
Create an S3 bucket and upload the content in the .open-next/assets folder to the root of the bucket. For example, the file .open-next/assets/favicon.ico should be uploaded to /favicon.ico at the root of the bucket. If you need to upload the files to a subfolder within the bucket, refer to this section.
There are two types of files in the .open-next/assets folder:
Hashed files
These are files with a hash component in the file name. Hashed files are be found in the .open-next/assets/_next folder, such as .open-next/assets/_next/static/css/0275f6d90e7ad339.css. The hash values in the filenames are guaranteed to change when the content of the files is modified. Therefore, hashed files should be cached both at the CDN level and at the browser level. When uploading the hashed files to S3, the recommended cache control setting is
- ```
- public,max-age=31536000,immutable
- ```
Un-hashed files
Other files inside the .open-next/assets folder are copied from your app's public/ folder, such as .open-next/assets/favicon.ico. The filename for un-hashed files may remain unchanged when the content is modified. Un-hashed files should be cached at the CDN level, but not at the browser level. When the content of un-hashed files is modified, the CDN cache should be invalidated on deploy. When uploading the un-hashed files to S3, the recommended cache control setting is
- ```
- public,max-age=0,s-maxage=31536000,must-revalidate
- ```
Cache files
Create an S3 bucket and upload the content in the .open-next/cache folder to the root of the bucket. If you need to upload the files to a subfolder within the bucket, refer to this section.
There are two types of caches in the .open-next/cache folder:
- Route cache: This cache includes html and json files that are prerendered during the build. They are used to seed the revalidation cache.
- Fetch cache: This cache includes fetch call responses, which might contain sensitive information. Make sure these files are not publicly accessible.
Image optimization function
Create a Lambda function using the code in the .open-next/image-optimization-function folder, with the handler index.mjs. Also, ensure that the function is configured as follows:
- Set the architecture to arm64.
- Set the BUCKET_NAME environment variable with the value being the name of the S3 bucket where the original images are stored.
- Set the BUCKET_KEY_PREFIX environment variable if the asset files are uploaded to a subfolder in the S3 bucket. The value is the path to the folder. This is Optional.
- Grant s3:GetObject permission.
Note that the image optimization function responds with the Cache-Control header, so the image will be cached both at the CDN level and at the browser level.
Server Lambda function
Create a Lambda function using the code in the .open-next/server-function folder, with the handler index.mjs. Also, ensure that the function is configured as follows:
- Set the CACHE_BUCKET_NAME environment variable with the value being the name of the S3 bucket where the cache files are stored.
- Set the CACHE_BUCKET_KEY_PREFIX environment variable if the cache files are uploaded to a subfolder in the S3 bucket. The value is the path to the folder. This is optional.
- Set the CACHE_BUCKET_REGION environment variable with the value being the region of the S3 bucket.
- Set the REVALIDATION_QUEUE_URL environment variable with the value being the URL of the revalidation queue.
- Set the REVALIDATION_QUEUE_REGION environment variable with the value being the region of the revalidation queue.
- Grant s3:GetObject, s3:PutObject, and s3:ListObjects permission.
- Grant sqs:SendMessage permission.
This function handles all other types of requests from the Next.js app, including Server-side Rendering (SSR) requests and API requests. OpenNext builds the Next.js app in standalone mode. The standalone mode generates a .next folder containing the NextServer class that handles requests and a node_modules folder with all the dependencies needed to run the NextServer. The structure looks like this:
- ```
- .next/ -> NextServer
- node_modules/ -> dependencies
- ```
The server function adapter wraps around NextServer and exports a handler function that supports the Lambda request and response. The server-function bundle looks like this:
- ```diff
- .next/ -> NextServer
- + .open-next/
- node_modules/ -> dependencies
- + index.mjs -> server function adapter
- ```
Monorepo
In the case of a monorepo, the build output looks slightly different. For example, if the app is located in packages/web, the build output looks like this:
- ```
- packages/
- web/
- .next/ -> NextServer
- node_modules/ -> dependencies from root node_modules (optional)
- node_modules/ -> dependencies from package node_modules
- ```
In this case, the server function adapter needs to be created inside packages/web next to .next/. This is to ensure that the adapter can import dependencies from both node_modules folders. It is not a good practice to have the Lambda configuration coupled with the project structure, so instead of setting the Lambda handler to packages/web/index.mjs, we will add a wrapper index.mjs at the server-function bundle root that re-exports the adapter. The resulting structure looks like this:
- ```diff
- packages/
- web/
- .next/ -> NextServer
- + .open-next/
- node_modules/ -> dependencies from root node_modules (optional)
- + index.mjs -> server function adapter
- node_modules/ -> dependencies from package node_modules
- + index.mjs -> adapter wrapper
- ```
This ensures that the Lambda handler remains at index.mjs.
CloudFront distribution
Create a CloudFront distribution, and dispatch requests to their corresponding handlers (behaviors). The following behaviors are configured:
Running at edge
The server function can also run at edge locations by configuring it as Lambda@Edge on Origin Request. The server function can accept both regional request events (API payload version 2.0) and edge request events (CloudFront Origin Request payload). Depending on the shape of the Lambda event object, the function will process the request accordingly.
To configure the CloudFront distribution:
| Behavior | Requests | CloudFront | Lambda@Edge | Origin |
|---|---|---|---|---|
| ----------------------------------------------------------------------------------------------------------------------------- | ------------------- | ------------------------------------------------------------------------------------------- | --------------- | --------------------------- |
| `/_next/static/*` | Hashed | - | - | S3 |
`/favicon.ico`| public | - | - | S3 | |
| `/_next/image` | Image | - | - | image |
| `/_next/data/*` | data | set | server | - |
| `/api/*` | API | set | server | - |
| `/*` | catch | set | server | - |
Revalidation function
Create a Lambda function using the code in the .open-next/revalidation-function folder, with the handler index.mjs.
Also, create an SQS FIFO queue, and set it as the event source for this function.
This function polls the queue for revalidation messages. Upon receiving a message, the function sends a HEAD request to the specified route for its revalidation.
Warmer function
Create a Lambda function using the code in the .open-next/warmer-function folder, with the handler index.mjs. Ensure the function is configured as follows:
- Set the FUNCTION_NAME environment variable with the value being the name of the server Lambda function.
- Set the CONCURRENCY environment variable with the value being the number of server functions to warm.
- Grant lambda:InvokeFunction permission to allow the warmer to invoke the server function.
Also, create an EventBridge scheduled rule to invoke the warmer function every 5 minutes.
Read more on how warming works.
How ISR works
In standalone mode, Next.js prebuilds the ISR cache during the build process. And at runtime, NextServer expects this cache locally on the server. This works effectively when the server is run on a single web server machine, sharing the cache across all requests. In a Lambda environment, the cache needs to be housed centrally in a location accessible by all server Lambda function instances. S3 serves as this central location.
To facilitate this:
- ISR cache files are excluded from the server-function bundle and instead are uploaded to the cache bucket.
- The default cache handler is replaced with a custom cache handler by configuring the [incrementalCacheHandlerPath](https://nextjs.org/docs/app/api-reference/next-config-js/incrementalCacheHandlerPath) field in next.config.js.
- The custom cache handler manages the cache files on S3, handling both reading and writing operations.
- If the cache is stale, the server-function sends the stale response back to the user while sending a message to the revalidation queue to trigger background revalidation.
- The revalidation-function polls the message from the queue and makes a HEAD request to the route with the x-prerender-revalidate header.
- The server-function receives the HEAD request and revalidates the cache.
On-demand revalidation
When you manualy revalidates the Next.js cache for a specific page, the ISR cache files stored on S3 will be updated. However, it is still necessary to invalidate the CloudFront cache:
- ```ts
- // pages/api/revalidate.js
- export default async function handler(req, res) {
- await res.revalidate("/foo");
- await invalidateCloudFrontPaths(["/foo"]);
- // ...
- }
- ```
If the pages router is in use, you must also invalidate the _next/data/BUILD_ID/foo.json path. The value for BUILD_ID can be found in the .next/BUILD_ID build output and can be accessed at runtime via the process.env.NEXT_BUILD_ID environment variable.
- ```ts
- await invalidateCloudFrontPaths([
- "/foo",
- `/_next/data/${process.env.NEXT_BUILD_ID}/foo.json`,
- ]);
- ```
And here is an example of the invalidateCloudFrontPaths() function:
- ```ts
- import {
- CloudFrontClient,
- CreateInvalidationCommand,
- } from "@aws-sdk/client-cloudfront";
- const cloudFront = new CloudFrontClient({});
- function invalidateCFPaths(paths: string[]) {
- cloudFront.send(
- new CreateInvalidationCommand({
- // Set CloudFront distribution ID here
- DistributionId: distributionId,
- InvalidationBatch: {
- CallerReference: `${Date.now()}`,
- Paths: {
- Quantity: paths.length,
- Items: paths,
- },
- },
- })
- );
- }
- ```
Note that manual CloudFront path invalidation incurs costs. According to the AWS CloudFront pricing page:
No additional charge for the first 1,000 paths requested for invalidation each month. Thereafter, $0.005 per path requested for invalidation.
Due to these costs, if multiple paths require invalidation, it is more economical to invalidate a wildcard path /*. For example:
- ```ts
- // This costs $0.005 x 3 = $0.015 after the first 1000 paths
- await invalidateCFPaths(["/page/a", "/page/b", "/page/c"]);
- // This costs $0.005, but also invalidates other routes such as "page/d"
- await invalidateCFPaths(["/page/*"]);
- ```
Please note that on-demand revalidation via the [next/cache module](https://nextjs.org/docs/app/building-your-application/data-fetching/revalidating#using-on-demand-revalidation) (revalidatePath and revalidateTag) is not yet supported.
How warming works
Server functions may experience performance issues due to Lambda cold starts. To mitigate this, the server function can be invoked periodically. Remember, Warming is optional and is only required if you want to keep the server function warm.
Please note, warming is currently only supported when the server function is deployed to a single region (Lambda).
Prewarm
Each time you deploy, a new version of the Lambda function will be generated. All warmed server function instances will be turned off. And there won't be any warm instances until the warmer function runs again at the next 5-minute interval.
To ensure the functions are prewarmed on deploy, create a CloudFormation Custom Resource to invoke the warmer function on deployment. The custom resource should be configured as follows:
- Invoke the warmer function on resource Create and Update.
- Include a timestamp value in the resource property to ensure the custom resource runs on every deployment.
- Grant lambda:InvokeFunction permission to allow the custom resource to invoke the warmer function.
Cost
There are three components to the cost:
1. EventBridge scheduler: $0.00864
Requests cost — 8,640 invocations per month x $1/million = $0.00864
1. Warmer function: $0.145728288
Requests cost — 8,640 invocations per month x $0.2/million = $0.001728
Duration cost — 8,640 invocations per month x 1GB memory x 1s duration x $0.0000166667/GB-second = $0.144000288
1. Server function: $0.0161280288 per warmed instance
Requests cost — 8,640 invocations per month x $0.2/million = $0.001728
Duration cost — 8,640 invocations per month x 1GB memory x 100ms duration x $0.0000166667/GB-second = $0.0144000288
For example, keeping 50 instances of the server function warm will cost approximately $0.96 per month
- ```
- $0.00864 + $0.145728288 + $0.0161280288 x 50 = $0.960769728
- ```
This cost estimate is based on the us-east-1 region pricing and does not consider any free tier benefits.
Limitations and workarounds
WORKAROUND: Create one cache behavior per top-level file and folder in public/ (AWS specific)
As mentioned in the Asset files section, files in your app'spublic/ folder are static and are uploaded to the S3 bucket. And requests for these files are handled by the S3 bucket, like so:
- ```
- https://my-nextjs-app.com/favicon.ico
- https://my-nextjs-app.com/my-images/avatar.png
- ```
Ideally, we would create a single cache behavior that routes all requests for public/ files to the S3 bucket. Unfortunately, CloudFront does not support regex or advanced string patternss for cache behaviors (ie. /favicon.ico|my-images\/*/ ).
To work around this limitation, we create a separate cache behavior for each top-level file and folder in public/. For example, if your folder structure is:
- ```
- public/
- favicon.ico
- my-images/
- avatar.png
- avatar-dark.png
- foo/
- bar.png
- ```
You would create three cache behaviors: /favicon.ico, `/my-images/, and /foo/`. Each of these behaviors points to the S3 bucket.
One thing to be aware of is that CloudFront has a default limit of 25 behaviors per distribution. If you have a lot of top-level files and folders, you may reach this limit. To avoid this, consider moving some or all files and folders into a subdirectory:
- ```
- public/
- files/
- favicon.ico
- my-images/
- avatar.png
- avatar-dark.png
- foo/
- bar.png
- ```
In this case, you only need to create one cache behavior: /files/*.
Make sure to update your code accordingly to reflect the new file paths.
Alternatively, you can request an increase to the limit through AWS Support.
WORKAROUND: Set x-forwarded-host header (AWS specific)
When the server function receives a request, the host value in the Lambda request header is set to the hostname of the AWS Lambda service instead of the actual frontend hostname. This creates an issue for the server function (middleware, SSR routes, or API routes) when it needs to know the frontend host.
To work around the issue, a CloudFront function is run on Viewer Request, which sets the frontend hostname as the x-forwarded-host header. The function code looks like this:
- ```ts
- function handler(event) {
- var request = event.request;
- request.headers["x-forwarded-host"] = request.headers.host;
- return request;
- }
- ```
The server function would then sets the host header of the request to the value of the x-forwarded-host header when sending the request to the NextServer.
WORKAROUND: Set NextRequest geolocation data
When your application is hosted on Vercel, you can access a user's geolocation inside your middleware through the NextRequest object.
- ```ts
- export function middleware(request: NextRequest) {
- request.geo.country;
- request.geo.city;
- }
- ```
When your application is hosted on AWS, you can obtain the geolocation data from CloudFront request headers. However, there is no way to set this data on theNextRequest object passed to the middleware function.
To work around the issue, the NextRequest constructor is modified to initialize geolocation data from CloudFront headers, instead of using the default empty object.
- ```diff
- - geo: init.geo || {}
- + geo: init.geo || {
- + country: this.headers("cloudfront-viewer-country"),
- + countryName: this.headers("cloudfront-viewer-country-name"),
- + region: this.headers("cloudfront-viewer-country-region"),
- + regionName: this.headers("cloudfront-viewer-country-region-name"),
- + city: this.headers("cloudfront-viewer-city"),
- + postalCode: this.headers("cloudfront-viewer-postal-code"),
- + timeZone: this.headers("cloudfront-viewer-time-zone"),
- + latitude: this.headers("cloudfront-viewer-latitude"),
- + longitude: this.headers("cloudfront-viewer-longitude"),
- + metroCode: this.headers("cloudfront-viewer-metro-code"),
- + }
- ```
CloudFront provides more detailed geolocation information, such as postal code and timezone. Here is a complete list of geo properties available in your middleware:
- ```ts
- export function middleware(request: NextRequest) {
- // Supported by Next.js
- request.geo.country;
- request.geo.region;
- request.geo.city;
- request.geo.latitude;
- request.geo.longitude;
- // Also supported by OpenNext
- request.geo.countryName;
- request.geo.regionName;
- request.geo.postalCode;
- request.geo.timeZone;
- request.geo.metroCode;
- }
- ```
WORKAROUND: NextServer does not set cache headers for HTML pages
As mentioned in the Server function section, the server function uses theNextServer class from Next.js' build output to handle requests. However, NextServer does not seem to set the correct Cache Control headers.
To work around the issue, the server function checks if the request is for an HTML page, and sets the Cache Control header to:
- ```
- public, max-age=0, s-maxage=31536000, must-revalidate
- ```
WORKAROUND: NextServer does not set correct SWR cache headers
NextServer does not seem to set an appropriate value for the stale-while-revalidate cache header. For example, the header might look like this:
- ```
- s-maxage=600 stale-while-revalidate
- ```
This prevents CloudFront from caching the stale data.
To work around the issue, the server function checks if the response includes the stale-while-revalidate header. If found, it sets the value to 30 days:
- ```
- s-maxage=600 stale-while-revalidate=2592000
- ```
WORKAROUND: Set NextServer working directory (AWS specific)
Next.js recommends using process.cwd() instead of __dirname to get the app directory. For example, consider a posts folder in your app with markdown files:
- ```
- pages/
- posts/
- my-post.md
- public/
- next.config.js
- package.json
- ```
You can build the file path like this:
- ```ts
- path.join(process.cwd(), "posts", "my-post.md");
- ```
As mentioned in the Server function section, in a non-monorepo setup, theserver-function bundle looks like:
- ```
- .next/
- node_modules/
- posts/
- my-post.md <- path is "posts/my-post.md"
- index.mjs
- ```
In this case, path.join(process.cwd(), "posts", "my-post.md") resolves to the correct path.
However, when the user's app is inside a monorepo (ie. at /packages/web), the server-function bundle looks like:
- ```
- packages/
- web/
- .next/
- node_modules/
- posts/
- my-post.md <- path is "packages/web/posts/my-post.md"
- index.mjs
- node_modules/
- index.mjs
- ```
In this case, path.join(process.cwd(), "posts", "my-post.md") cannot be resolved.
To work around the issue, we change the working directory for the server function to where .next/ is located, ie. packages/web.
WORKAROUND: Set __NEXT_PRIVATE_PREBUNDLED_REACT to use prebundled React
For Next.js 13.2 and later versions, you need to explicitly set the __NEXT_PRIVATE_PREBUNDLED_REACT environment variable. Although this environment variable isn't documented at the time of writing, you can refer to the Next.js source code to understand its usage:
In standalone mode, we don't have separated render workers so if both app and pages are used, we need to resolve to the prebundled React to ensure the correctness of the version for app.
Require these modules with static paths to make sure they are tracked by NFT when building the app in standalone mode, as we are now conditionally aliasing them it's tricky to track them in build time.
On every request, we try to detect whether the route is using the Pages Router or the App Router. If the Pages Router is being used, we set __NEXT_PRIVATE_PREBUNDLED_REACT to undefined, which means the React version from the node_modules is used. However, if the App Router is used, __NEXT_PRIVATE_PREBUNDLED_REACT is set, and the prebundled React version is used.
Example
In the example folder, you can find a Next.js benchmark app. It contains a variety of pages that each test a single Next.js feature. The app is deployed to both Vercel and AWS using SST.
AWS link: https://d1gwt3w78t4dm3.cloudfront.net
Vercel link: https://open-next.vercel.app
Advanced usage
Custom build command
OpenNext runs the build script in your package.json by default. However, you can specify a custom build command if required.
- ```bash
- # CLI
- open-next build --build-command "pnpm custom:build"
- ```
- ```ts
- // JS
- import { build } from "open-next/build.js";
- await build({
- buildCommand: "pnpm custom:build",
- });
- ```
Minify server function
Enabling this option will minimize all .js and .json files in the server function bundle using the node-minify library. This can reduce the size of the server function bundle by about 40%, depending on the size of your app.
- ```bash
- # CLI
- open-next build --minify
- ```
- ```ts
- // JS
- import { build } from "open-next/build.js";
- await build({
- minify: true,
- });
- ```
This feature is currently experimental and needs to be opted into. It can significantly decrease the server function's cold start time. Once it is thoroughly tested and its stability is confirmed, it will be enabled by default.
Reusing same bucket for asset and cache
Typically, asset files are uploaded to the root of the bucket. However, you might want to store them in a subfolder of the bucket, for instance, when:
- using a pre-existing bucket; or
- storing both assets and cache files in the same bucket.
If you choose to upload asset files to a subfolder (ie. "assets"), be sure to:
- Set the BUCKET_KEY_PREFIX environment variable for the image optimization function to assets.
- Set the "origin path" for the CloudFront S3 origin to assets.
Similarly, if you decide to upload cache files to a subfolder (ie. "cache"), be sure to:
- Set the CACHE_BUCKET_KEY_PREFIX environment variable for the server function to cache.
Debug mode
OpenNext can be executed in debug mode for bug tracking purposes.
- ```bash
- # CLI
- OPEN_NEXT_DEBUG=true npx open-next@latest build
- ```
- ```ts
- // JS
- import { build } from "open-next/build.js";
- await build({
- debug: true,
- });
- ```
This does a few things:
1. Lambda handler functions in the build output will not be minified.
1. Lambda handler functions in the build output has sourcemap enabled inline.
1. Lambda handler functions will automatically console.log the request event object along with other debugging information.
It is recommended to turn off debug mode when building for production because:
1. Un-minified function code is 2-3X larger than minified code. This will result in longer Lambda cold start times.
1. Logging the event object on each request can result in a lot of logs being written to AWS CloudWatch. This will result in increased AWS costs.
Debugging
Function logs
To find the server, image optimization, and warmer log, go to the AWS CloudWatch console in the region you deployed to.
If the server function is deployed to Lambda@Edge, the logs will appear in the region you are physically close to. For example, if you deployed your app to us-east-1 and you are visiting the app from in London, the logs are likely to be in eu-west-2.
Warmer function logs
The logs from the warmer function provide insights into the results of the warming process.
- ```
- { event: 'warmer result', sent: 2, success: 2, uniqueServersWarmed: 2 }
- ```
- sent — The number of times the warmer invoked the server function using the Lambda SDK. This value should correspond to the CONCURRENCY set in the warmer function.
- success — The number of SDK calls that returned a 200 status code, indicating successful invocations.
- uniqueServersWarmed — This helps track any instances that responded unusually quickly and served multiple warming requests. As all SDK calls are made concurrently using await Promise.all(), this metric is useful for monitoring the number of unique warmed instances.
Opening an issue
To help diagnose issues, it's always helpful to provide a reproducible setup when opening an issue. One easy way to do this is to create a pull request (PR) and add a new page to the benchmark app located in theexample folder, which reproduces the issue. The PR will automatically deploy the app to AWS.
Contribute
To run OpenNext locally:
1. Clone this repository.
1. Build open-next:
bash
cd open-next
pnpm build
1. Run open-next in watch mode:
bash
pnpm dev
1. Now, you can make changes in open-next and build your Next.js app to test the changes.
bash
cd path/to/my/nextjs/app
path/to/open-next/packages/open-next/dist/index.js build
FAQ
Will my Next.js app behave the same as it does on Vercel?
OpenNext aims to deploy your Next.js app to AWS using services like CloudFront, S3, and Lambda. While Vercel uses some AWS services, it also has proprietary infrastructures, resulting in a natural gap of feature parity. And OpenNext is filling that gap.
One architectural difference is how middleware is run, but this should not affect the behavior of most apps.
On Vercel, the Next.js app is built in an undocumented way using the "minimalMode". The middleware code is separated from the server code and deployed to edge locations, while the server code is deployed to a single region. When a user makes a request, the middleware code runs first. Then the request reaches the CDN. If the request is cached, the cached response is returned; otherwise, the request hits the server function. This means that the middleware is called even for cached requests.
On the other hand, OpenNext uses the standard next build command, which generates a server function that includes the middleware code. This means that for cached requests, the CDN (CloudFront) will send back the cached response, and the middleware code is not run.
We previously built the app using the "minimalMode" and having the same architecture as Vercel, where the middleware code would run in Lambda@Edge on Viewer Request. See the [vercel-mode branch](https://github.com/serverless-stack/open-next/tree/vercel-mode). However, we decided that this architecture was not a good fit on AWS for a few reasons:
1. Cold start - Running middleware and server in two separate Lambda functions results in double the latency.
1. Maintenance - Because the "minimalMode" is not documented, there will likely be unhandled edge cases, and triaging would require constant reverse engineering of Vercel's code base.
1. Feature parity - Lambda@Edge functions triggered on Viewer Request do not have access to geolocation headers, which affects i18n support.
How does OpenNext compared to AWS Amplify?
OpenNext is an open source initiative, and there are a couple of advantages when compared to Amplify:
1. The community contributions to OpenNext allows it to have better feature support. For example, Amplify does not currently support on-demand revalidation.
1. Amplify's Next.js hosting is a black box. Resources are not deployed to your AWS account. All Amplify users share the same CloudFront CDN owned by the Amplify team. This prevents you from customizing the setup, and customization is important if you are looking for Vercel-like features.
1. Amplify's implementation is closed-source. Bug fixes often take much longer to get fixed as you have to go through AWS support. And you are likely to encounter more quirks when hosting Next.js anywhere but Vercel.
