

BacktopJS
Automates visual regression testing of your responsive web UI by comparing ...
README

BackstopJS
BackstopJS automates visual regression testing of your responsive web UI by comparing DOM screenshots over time.
News
Backstop 6.0.1 -- now with Playwright engine! Many thanks to our friend @FrostyShosty who came out of nowhere and made it happen!
EmberJS users -- check out our ember-backstop test helper! https://github.com/garris/ember-backstop
Want to learn how to Backstop from a pro? Check out visual regression testing with BackstopJS on udemy.com by Walmyr Filho
Backstop Features
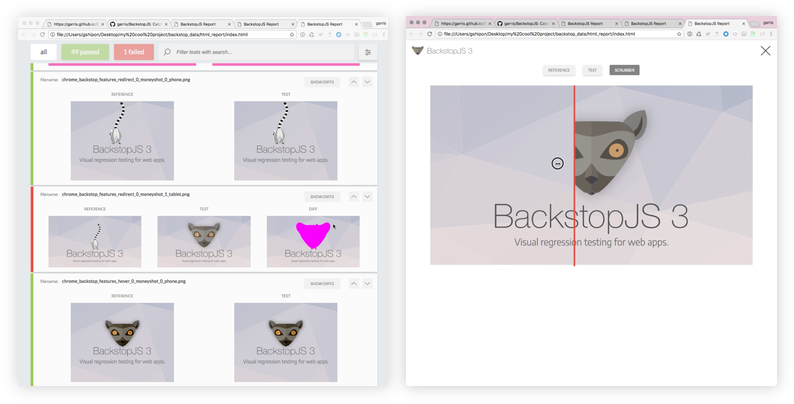
- In-browser reporting UI with...
layout settings for print and screen
scenario display filtering
reference, test, visual diff inspector
cool scrubber thingy
approving a test
- Integrated Docker rendering -- to eliminate cross-platform rendering shenanigans
- CLI reports
- Render tests with Chrome Headless
- Simulate user interactions with Playwright or Puppeteer scripts
- JUnit reports
- Plays nice with CI and source control
- Run globally or locally as a standalone package app or require('backstopjs') right into your node app
- Incredibly easy to use: just 3 commands go a long long way!
Install BackstopJS now
- ```sh
- $ npm install -g backstopjs
- ```
Contents
The BackstopJS workflow
- backstop init: Set up a new BackstopJS instance -- specify URLs, cookies, screen sizes, DOM selectors, interactions etc. (see examples directory)
- backstop test: BackstopJS creates a set of test screenshots and compares them with your reference screenshots. Any changes show up in a visual report. (Run this after making CSS changes as many times as needed.)
- backstop approve: If the test you ran looks good, then go ahead and approve it. Approving changes will update your reference files with the results from your last test. Future tests are compared against your most recent approved test screenshots.
Getting started
Installation
Global installation (recommended)
- ```sh
- $ npm install -g backstopjs
- ```
Local installation
BackstopJS will run as a totally stand alone app -- but installing locally allows you to do this...
- ``` js
- const backstop = require('backstopjs');
- ```
See Integration Options to learn about cool BackstopJS integration options!
Initializing your project
If you don't already have BackstopJS set up...
BackstopJS can create a default configuration file and project scaffolding in your current working directory. Please note: this will overwrite any existing files!
cd to your project's directory and run...
- ```sh
- $ backstop init
- ```
Working with your config file
By default, BackstopJS places backstop.json in the root of your project. And also by default, BackstopJS looks for this file when invoked.
JS based config file
You may use a javascript based config file to allow comments in your config. Be sure to _export your config object as a node module_.
Example: Create a backstop.config.js
- ```
- module.exports = { Same object as backstop.json }
- ```
and then backstop test --config="backstop.config.js"
Required config properties
As a new user setting up tests for your project, you will be primarily concerned with these properties...
id – Used for screenshot naming. Set this property when sharing reference files with teammates -- otherwise omit and BackstopJS will auto-generate one for you to avoid naming collisions with BackstopJS resources.
viewports – An array of screen size objects your DOM will be tested against. Add as many as you like -- but add at least one.
scenarios – This is where you set up your actual tests. The important sub properties are...
- scenarios[n].label – Required. Also used for screenshot naming.
- scenarios[n].url – Required. Tells BackstopJS what endpoint/document you want to test. This can be an absolute URL or local to your current working directory.
_TIP: no other SCENARIO properties are required. Other properties can just be added as necessary_
Generating test bitmaps
- ```sh
- $ backstop test
- ```
Once the test bitmaps are generated, a report comparing the most recent test bitmaps against the current reference bitmaps will display.
Tip The --filter argument offers a useful shortcut for re-running a single test or failed tests.
Pass a --docker flag to render your test in a Docker container -- this will help with consistency if you are attempting to compare references across multiple environments.
Approving changes
- ```sh
- $ backstop approve
- ```
When running this command, all images (with changes) from your most recent test batch will be promoted to your reference collection. Subsequent tests will be compared against your updated reference files.
Using BackstopJS
Advanced Scenarios
Scenario properties are described throughout this document and processed sequentially in the following order...
- ``` js
- label // [required] Tag saved with your reference images
- onBeforeScript // Used to set up browser state e.g. cookies.
- cookiePath // import cookies in JSON format (available with default onBeforeScript see setting cookies below)
- url // [required] The url of your app state
- referenceUrl // Specify a different state or environment when creating reference.
- readyEvent // Wait until this string has been logged to the console.
- readySelector // Wait until this selector exists before continuing.
- readyTimeout // Timeout for readyEvent and readySelector (default: 30000ms)
- delay // Wait for x milliseconds
- hideSelectors // Array of selectors set to visibility: hidden
- removeSelectors // Array of selectors set to display: none
- onReadyScript // After the above conditions are met -- use this script to modify UI state prior to screen shots e.g. hovers, clicks etc.
- keyPressSelectors // Takes array of selector and string values -- simulates multiple sequential keypress interactions.
- hoverSelector // Move the pointer over the specified DOM element prior to screen shot.
- hoverSelectors // *Playwright and Puppeteer only* takes array of selectors -- simulates multiple sequential hover interactions.
- clickSelector // Click the specified DOM element prior to screen shot.
- clickSelectors // *Playwright and Puppeteer only* takes array of selectors -- simulates multiple sequential click interactions.
- postInteractionWait // Wait for a selector after interacting with hoverSelector or clickSelector (optionally accepts wait time in ms. Ideal for use with a click or hover element transition. available with default onReadyScript)
- scrollToSelector // Scrolls the specified DOM element into view prior to screen shot (available with default onReadyScript)
- selectors // Array of selectors to capture. Defaults to document if omitted. Use "viewport" to capture the viewport size. See Targeting elements in the next section for more info...
- selectorExpansion // See Targeting elements in the next section for more info...
- misMatchThreshold // Percentage of different pixels allowed to pass test
- requireSameDimensions // If set to true -- any change in selector size will trigger a test failure.
- viewports // An array of screen size objects your DOM will be tested against. This configuration will override the viewports property assigned at the config root.
- gotoParameters // An array of settings passed to page.goto(url, parameters) function.
- ```
Testing click and hover interactions
BackstopJS ships with an onReady script that enables the following interaction selectors...
- ``` js
- clickSelector: ".my-hamburger-menu",
- hoverSelector: ".my-hamburger-menu .some-menu-item",
- ```
The above would tell BackstopJS to wait for your app to generate an element with a .my-hamburger-menu class, then click that selector. Then it would wait again for a .my-hamburger-menu .some-menu-item class, then move the cursor over that element (causing a hover state). Then BackstopJS would take a screenshot.
You can use these properties independent of each other to easily test various click and or hover states in your app. These are obviously simple scenarios -- if you have more complex needs then this example should serve as a pretty good starting point create your own onReady scripts.
NOTE: Playwright and Puppeteer versions optionally take clickSelectors & hoverSelectors as arrays of selectors...
- ``` js
- clickSelectors: [".my-hamburger-menu",".my-hamburger-item"],
- hoverSelectors: [".my-nav-menu-item",".my-nav-menu-dropdown-item"],
- ```
Key Press interactions
BackstopJS ships with an onReady script that allows user to key press on selectors...
NOTE: Supports both Playwright and Puppeteer and takes arrays of selectors and key press values.
- ``` json
- scenarios [
- {
- "keyPressSelectors": [
- {
- "selector": "#email",
- "keyPress": "marcdacz@backstopjs.com"
- },
- {
- "selector": "#password",
- "keyPress": "1234"
- }
- ]
- }
- ]
- ```
Setting cookies
BackstopJS ships with an onBefore script that makes it easy to import cookie files…
- ``` json
- cookiePath "backstop_data/engine_scripts/cookies.json",
- ```
_note: path is relative to your current working directory_
Pro tip: If you want an easy way to manually export cookies from your browser then download this chrome extension. You can directly use the output cookie files with BackstopJS https://chrome.google.com/webstore/detail/%E3%82%AF%E3%83%83%E3%82%AD%E3%83%BCjson%E3%83%95%E3%82%A1%E3%82%A4%E3%83%AB%E5%87%BA%E5%8A%9B-for-puppet/nmckokihipjgplolmcmjakknndddifde
Targeting elements
BackstopJS makes it super easy to capture screenshots of your entire layout or just parts of your layout. This is defined in your scenario.selectors array. Elements are defined with standard CSS notation. By default BackstopJS takes a screenshot of the first occurrence of any selector found in your DOM. e.g. If you have three li tags in your layout only the first will used.
selectorExpansion
If you want BackstopJS to find and take screenshots of _all_ matching selector instances then there is a handy switch for that. Set selectorExpansion to true like so...
- ``` json
- scenarios [
- {
- "selectors": [
- ".aListOfStuff li"
- ],
- "selectorExpansion": true
- }
- ]
- // captures all
- tags inside .aListOfStuff
- ```
(Default behavior) If you want very explicit control of what you capture then you can disable selectorExpansion and explicitly select what you want...
- ``` json
- scenarios [
- {
- "selectors": [
- ".aListOfStuff li"
- ],
- "selectorExpansion": false
- }
- ]
- // Just captures the first
- tag inside .aListOfStuff
- ```
expect
When working with selector expansion(set selectors in selectors properties and set selectorExpansion to true), you might want to explicitly set the number of results that you expect to find by the selectors. Set expect in the scenario to a number which is greater than 0, then the test will fail for the scenario if the number of selected result does not match the expect number.
- ``` json
- scenarios [
- {
- "selectors": [
- ".aListOfStuff li"
- ],
- "selectorExpansion": true,
- "expect": 5
- }
- ]
- // captures all
- tags inside .aListOfStuff, and make sure the number of
- tags is 5
- ```
(Default behavior) If you don't care the number of the selected elements, just set expect to 0 or not set the property.
- ``` json
- scenarios [
- {
- "selectors": [
- ".aListOfStuff li"
- ],
- "selectorExpansion": false,
- "expect": 0
- }
- ]
- // Captures all
- tags inside .aListOfStuff, and not check the number of
- tags
- ```
Testing Progressive apps, SPAs and AJAX content
It is very common for client-side web apps is to initially download a small chunk of bootstrapping code/content/state and render it to the screen as soon as it arrives at the browser. Once this has completed, various JS components often take over to progressively load more content/state.
The problem testing these scenarios is knowing _when_ to take the screenshot. BackstopJS solves this problem with two config properties: readySelector, readyEvent and delay.
Trigger screen capture via selector
The readySelector property tells BackstopJS to wait until a selector exists before taking a screenshot. For example, the following line will delay screen capture until a selector with the id '#catOfTheDayResult' is present somewhere in the DOM.
- ``` json
- "readySelector": "#catOfTheDayResult"
- ```
Another approach might look like this...
- ``` json
- "readySelector": "body.ember-has-rendered"
- ```
Trigger screen capture via console.log()
The readyEvent property enables you to trigger the screen capture by logging a predefined string to the console. For example, the following line will delay screen capture until your web app calls console.log("backstopjs_ready")...
- ``` json
- "readyEvent": "backstopjs_ready"
- ```
In the above case it would be up to you to wait for all dependencies to complete before calling logging "backstopjs_ready" string to the console.
Delay screen capture
The delay property enables you to pause screen capturing for a specified duration of time. This delay is applied after readyEvent (if also applied).
- ``` js
- "delay": 1000 //delay in ms
- ```
In the above case, BackstopJS would wait for one second before taking a screenshot.
In the following case, BackstopJS would wait for one second after the string backstopjs_ready is logged to the console.
- ``` js
- {
- // ...
- "readyEvent": "backstopjs_ready",
- "delay": 1000 //delay in ms
- // ...
- }
- ```
Dealing with dynamic content
For obvious reasons, this screenshot approach is not optimal for testing live dynamic content. The best way to test a dynamic app would be to use a known static content data stub – or ideally many content stubs of varying lengths which, regardless of input length, should produce certain specific bitmap output.
Hiding selectors
That said, for a use case where you are testing a DOM with say an ad banner or a block of dynamic content which retains static dimensions, we have the hideSelectors property in capture/config.json which will set the corresponding DOM to visibility:hidden, thus hiding the content from our Resemble.js analysis but retaining the original layout flow.
- ``` json
- "hideSelectors": [
- "#someFixedSizeDomSelector"
- ]
- ```
Removing selectors
There may also be elements which need to be completely removed during testing. For that we have removeSelectors which removes them from the DOM before screenshots.
- ``` json
- "removeSelectors": [
- "#someUnpredictableSizedDomSelector"
- ]
- ```
Capturing Browser Console Logs
Sometimes you need a little more information to debug misbehavior. If that information is in the browser console logs, it won't appear in a screenshot. To capture the browser console logs along with the screenshots, set scenarioLogsInReports. ( _Note: In order to view the logs, you will have to serve the reports from an HTTP server. See Interactive Web Reporting below._)
- ``` json
- "scenarioLogsInReports": true
- ```
Changing test sensitivity
"misMatchThreshold" (percentage 0.00%-100.00%) will change the amount of difference BackstopJS will tolerate before marking a test screenshot as "failed". The default setting is 0.1, this may need to be adjusted based on the kinds of testing you're doing.
More info on how misMatchThreshold is derived can be found here... https://github.com/Huddle/Resemble.js/blob/af57cb2f4edfbe718d24b350b2be1d956b764298/resemble.js#L495
"requireSameDimensions" (true || false) will change whether BackstopJS will accept any change in dimensions. The default setting is true. If set to true then the test must be the same dimensions as the reference. If set to false the test does not have to be the same dimensions as the reference.
This setting can be used in conjunction with "misMatchThreshold", for example, when setting a "misMatchThreshold" of more than 0.00% and the mismatch causing a change in dimensions, setting "requireSameDimensions" to false will allow the test to still pass, setting it to true would still make it fail.
Capturing the entire document or just the viewport, or just an element, or a combination.
BackstopJS recognizes two magic selectors: document and viewport -- these capture the entire document and just the current specified viewport respectively. e.g.
- ``` js
- "scenarios": [
- {
- "selectors": [
- "document",
- "viewport",
- "#myFeature",
- // ...
- ],
- // ...
- }
- ]
- ```
Comparing different endpoints (e.g. comparing staging and production)
Pointing to different endpoints is easy. (e.g. to compare a production environment against a staging environment).
You can create reference files (without previewing) by using the command backstop reference. By default this command calls the url property specified in your config. Optionally, you can add a referenceUrl property to your scenario configuration. If found, BackstopJS will use referenceUrl for screen grabs when running $ backstop reference.
- ``` js
- "scenarios": [
- {
- "label": "cat meme feed sanity check",
- "url": "http://www.moreCatMemes.com",
- "referenceUrl": "http://staging.moreCatMemes.com:81",
- // ...
- }
- ]
- ```
Running custom scripts
Simulate user actions (click, scroll, hover, wait, etc.) or states (cookie values) by running your own script on ready. For each scenario, the custom .js file you specify is imported and run when the BackstopJS ready events are fulfilled.
From your project root, place your scripts in...
- ```sh
- ./backstop_data/engine_scripts
- ```
at the root of your config or in your scenario...
- ``` js
- "onReadyScript": "filename.js" // Runs after onReady event on all scenarios -- use for simulating interactions (.js suffix is optional)
- "onBeforeScript": "filename.js" // Runs before each scenario -- use for setting cookies or other env state (.js suffix is optional)
- "scenarios": [
- {
- "label": "cat meme feed sanity check",
- "onReadyScript": "filename.js" // If found will run instead of onReadyScript set at the root (.js suffix is optional)
- "onBeforeScript": "filename.js" // If found will run instead of onBeforeScript at the root (.js suffix is optional)
- // ...
- }
- ]
- ```
Inside filename.js, structure it like this:
- ``` js
- // onBefore example (puppeteer engine)
- module.exports = async (page, scenario, vp, isReference) => {
- await require('./loadCookies')(page, scenario);
- // Example: set user agent
- await page.setUserAgent('some user agent string here');
- };
- // onReady example (puppeteer engine)
- module.exports = async (page, scenario, vp) => {
- console.log('SCENARIO > ' + scenario.label);
- await require('./clickAndHoverHelper')(page, scenario);
- // Example: changing behavior based on config values
- if (vp.label === 'phone') {
- console.log( 'doing stuff for just phone viewport here' );
- }
- // add more stuff here...
- };
- ```
Setting the base path for custom onBefore and onReady scripts
By default, the base path is a folder called engine_scripts inside your BackstopJS installation directory. You can override this by setting the paths.scripts property in your backstop.json file to point to somewhere in your project directory (recommended).
- ``` json
- "paths": {
- "engine_scripts": "backstop_data/engine_scripts"
- }
- ```
onBeforeScript/onReadyScript available variables
onBefore(page, scenario, viewport, isReference, Engine, config)
- ```
- page: browser page object
- scenario: currently running scenario config
- viewport: viewport info
- isReference: whether scenario contains reference URL property
- Engine: Static class reference (Puppeteer/Playwright)
- config: the whole config object
- ```
Reporting workflow tips
One testing approach to consider is incorporating BackstopJS into your build process and just let the CLI report run on each build or before each deploy.
It's natural for your layout to break while you're in feature development -- in that case you might just run a backstop test when you feel things should be shaping up.
Use the report property in your config to enable or disable the respective properties. E.g. the following settings will open a browser and write a junit report.
- ``` json
- "report": ["browser", "CI"]
- ```
You can also specify a json report:
- ``` json
- "report": ["json"]
- ```
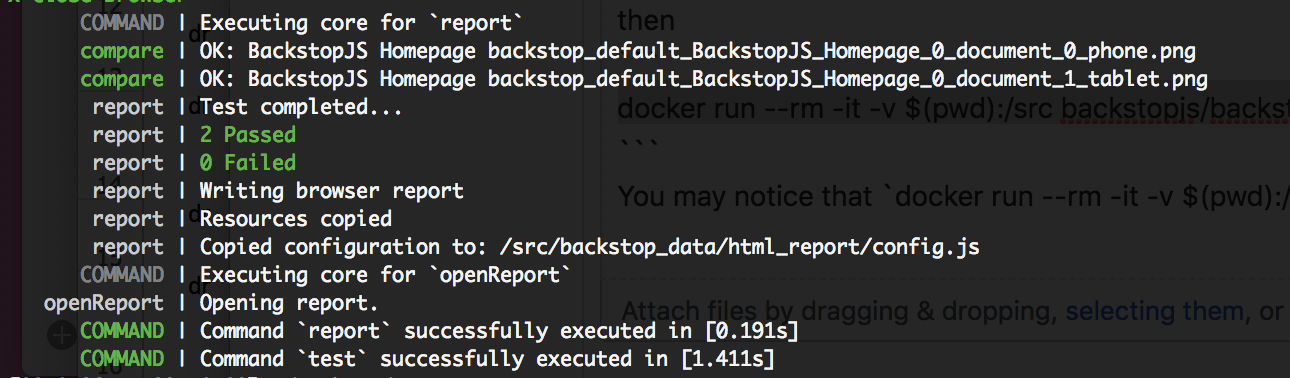
If you choose the CI-only reporting or even no reporting (CLI is always on) you can always enter the following command to see the latest test run report in the browser.
- ```sh
- $ backstop openReport
- ```
Test report integration with a build system like Jenkins/Travis
The following config would enable the CI - report (default: junit format)
- ``` json
- "report" : [ "CI" ],
- ```
The regression test report will be generated in the JUnit format and the report will be placed in the given directory (default: [backstopjs dir]/test/ci_report/xunit.xml).
You may customize the testsuite name and/or a report file (xunit.xml) path to your build report directory by using the below configuration overrides,
- ``` js
- "paths": {
- "ci_report" : "backstop_data/ci_report"
- },
- "ci": {
- "format" : "junit" ,
- "testReportFileName": "myproject-xunit", // in case if you want to override the default filename (xunit.xml)
- "testSuiteName" : "backstopJS"
- },
- ```
Interactive Web Reporting
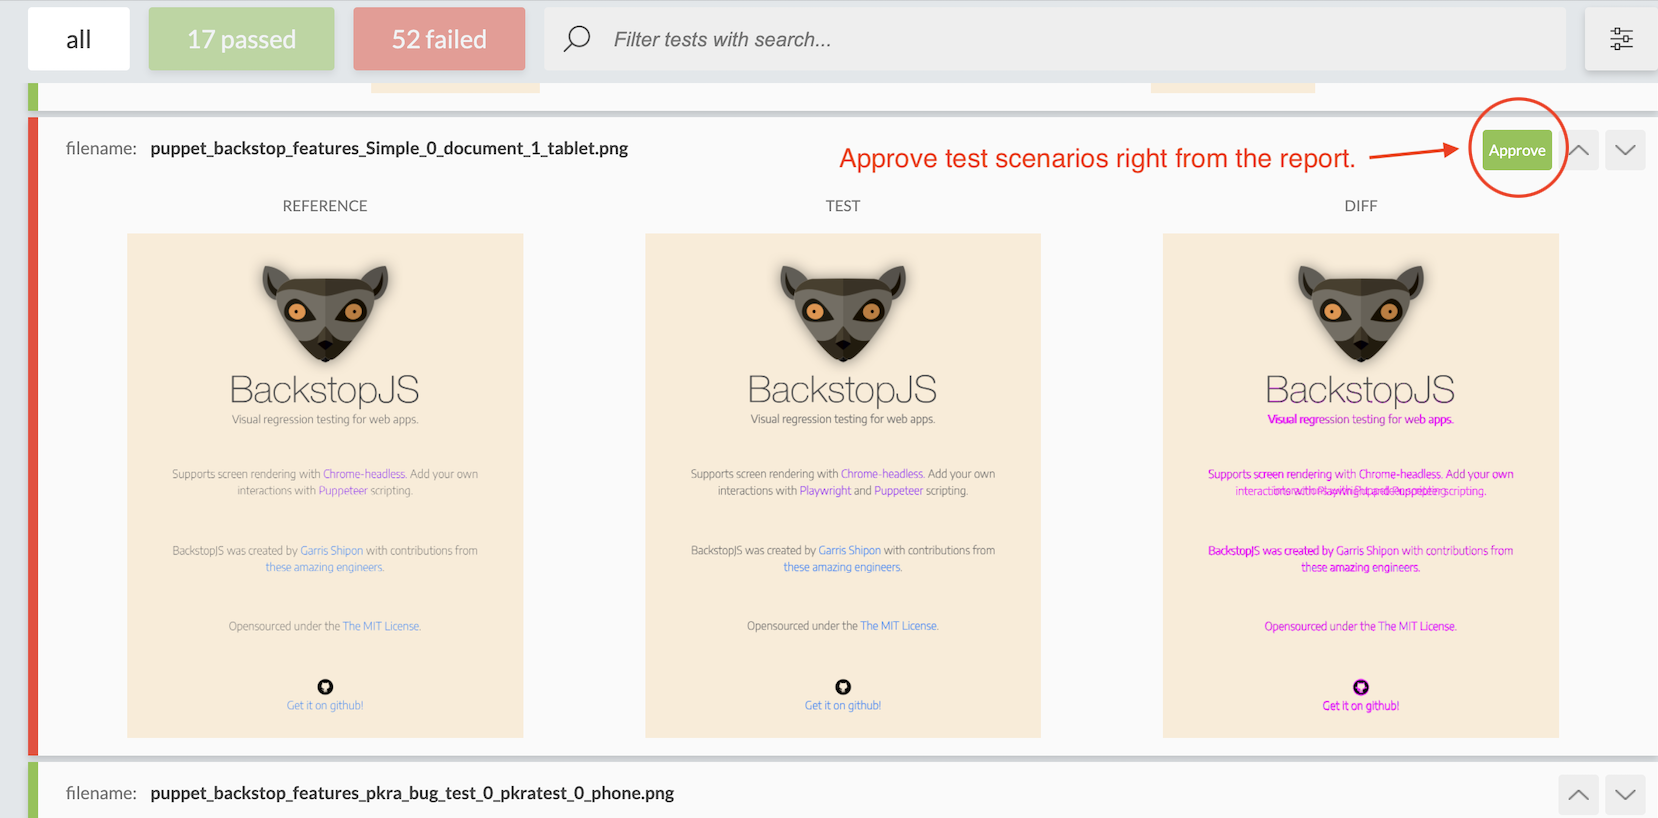
Backstop web reports support approving scenarios and viewing browser logs generated by each scenario. To enable these features you will need to run the backstop remote HTTP service in another terminal window...
- ``` sh
- BACKSTOP_REMOTE_HTTP_PORT=3000 backstop remote --config=<your config>
- ```
Tip: The command above needs to be running before you open the report, so that Backstop detects it automatically. By default Backstop will open a report after running backstop test. Additionally reports can always be opened by running backstop openReport. Also have a look at Reporting workflow tips.
BackstopJS and CLI return values
Pro Tip: When run on the command line, the BackstopJS process will return a 0 if tests were successful and a 1 if anything failed. So you always have the flexibility of branching way up high in your CLI if needed -- e.g....
- ```
- node ./backstopjs/cli/ test && echo 'passed' || echo 'failed'
- ```
CLI error handling
When a layout error is found in CLI mode, BackstopJS will let you know in a general report displayed in the console. In addition, BackstopJS will return a 1 (error) to the calling CLI process.
Setting the bitmap and script directory paths
By default, BackstopJS saves generated resources into the backstop_data directory in parallel with your backstop.json config file. The location of the various resource types are configurable so they can easily be moved inside or outside your source control or file sharing environment. See below for options...
Tip: these file paths are relative to your current working directory._
- ``` json
- ...
- "paths": {
- "bitmaps_reference": "backstop_data/bitmaps_reference",
- "bitmaps_test": "backstop_data/bitmaps_test",
- "engine_scripts": "backstop_data/engine_scripts",
- "html_report": "backstop_data/html_report",
- "json_report": "backstop_data/json_report",
- "ci_report": "backstop_data/ci_report",
- }
- ...
- ```
Changing the rendering engine
Both Puppeteer and Playwright are installed by default, though the default configuration is set to Puppeteer.
Chrome-Headless (The latest webkit library)
To use chrome headless you can currently use _puppeteer_ (https://github.com/GoogleChrome/puppeteer).
- ``` json
- "engine": "puppeteer"
- ```
Playwright
To use firefox or webkit, you can currently use _playwright_ (https://github.com/microsoft/playwright).
Be sure to also switch the onBefore and onReady scripts to the Playwright defaults. Playwright supports setting engineOptions.browser to chromium, firefox, or webkit.
The storageState config property is supported via theengineOptions object in backstop config. This sets cookies _and_ localStorage variables in the Playwright engine before tests are run. Very useful taking screenshots of pages that require authentication.
- ``` json
- ...
- "onBeforeScript": "playwright/onBefore.js",
- "onReadyScript": "playwright/onReady.js",
- ...
- "engine": "playwright"
- ...
- "engineOptions": {
- "browser": "chromium",
- "storageState": "/path/to/cookies-and-local-storage-file.json"
- }
- ...
- ```
Setting Puppeteer and Playwright option flags
Backstop sets two defaults for both Puppeteer and Playwright:
- ``` json
- ignoreHTTPSErrors true,
- headless
- ```
You can add more settings (or override the defaults) with the engineOptions property. (properties are merged)
- ``` json
- "engineOptions": {
- "ignoreHTTPSErrors": false,
- "args": ["--no-sandbox", "--disable-setuid-sandbox"],
- "gotoParameters": { "waitUntil": "networkidle0" },
- }
- ```
More info here:
Using Docker for testing across different environments
We've found that different environments can render the same webpage in slightly different ways -- in particular with text. E.G. see the text in this example rendering slightly differently between Linux and Mac...
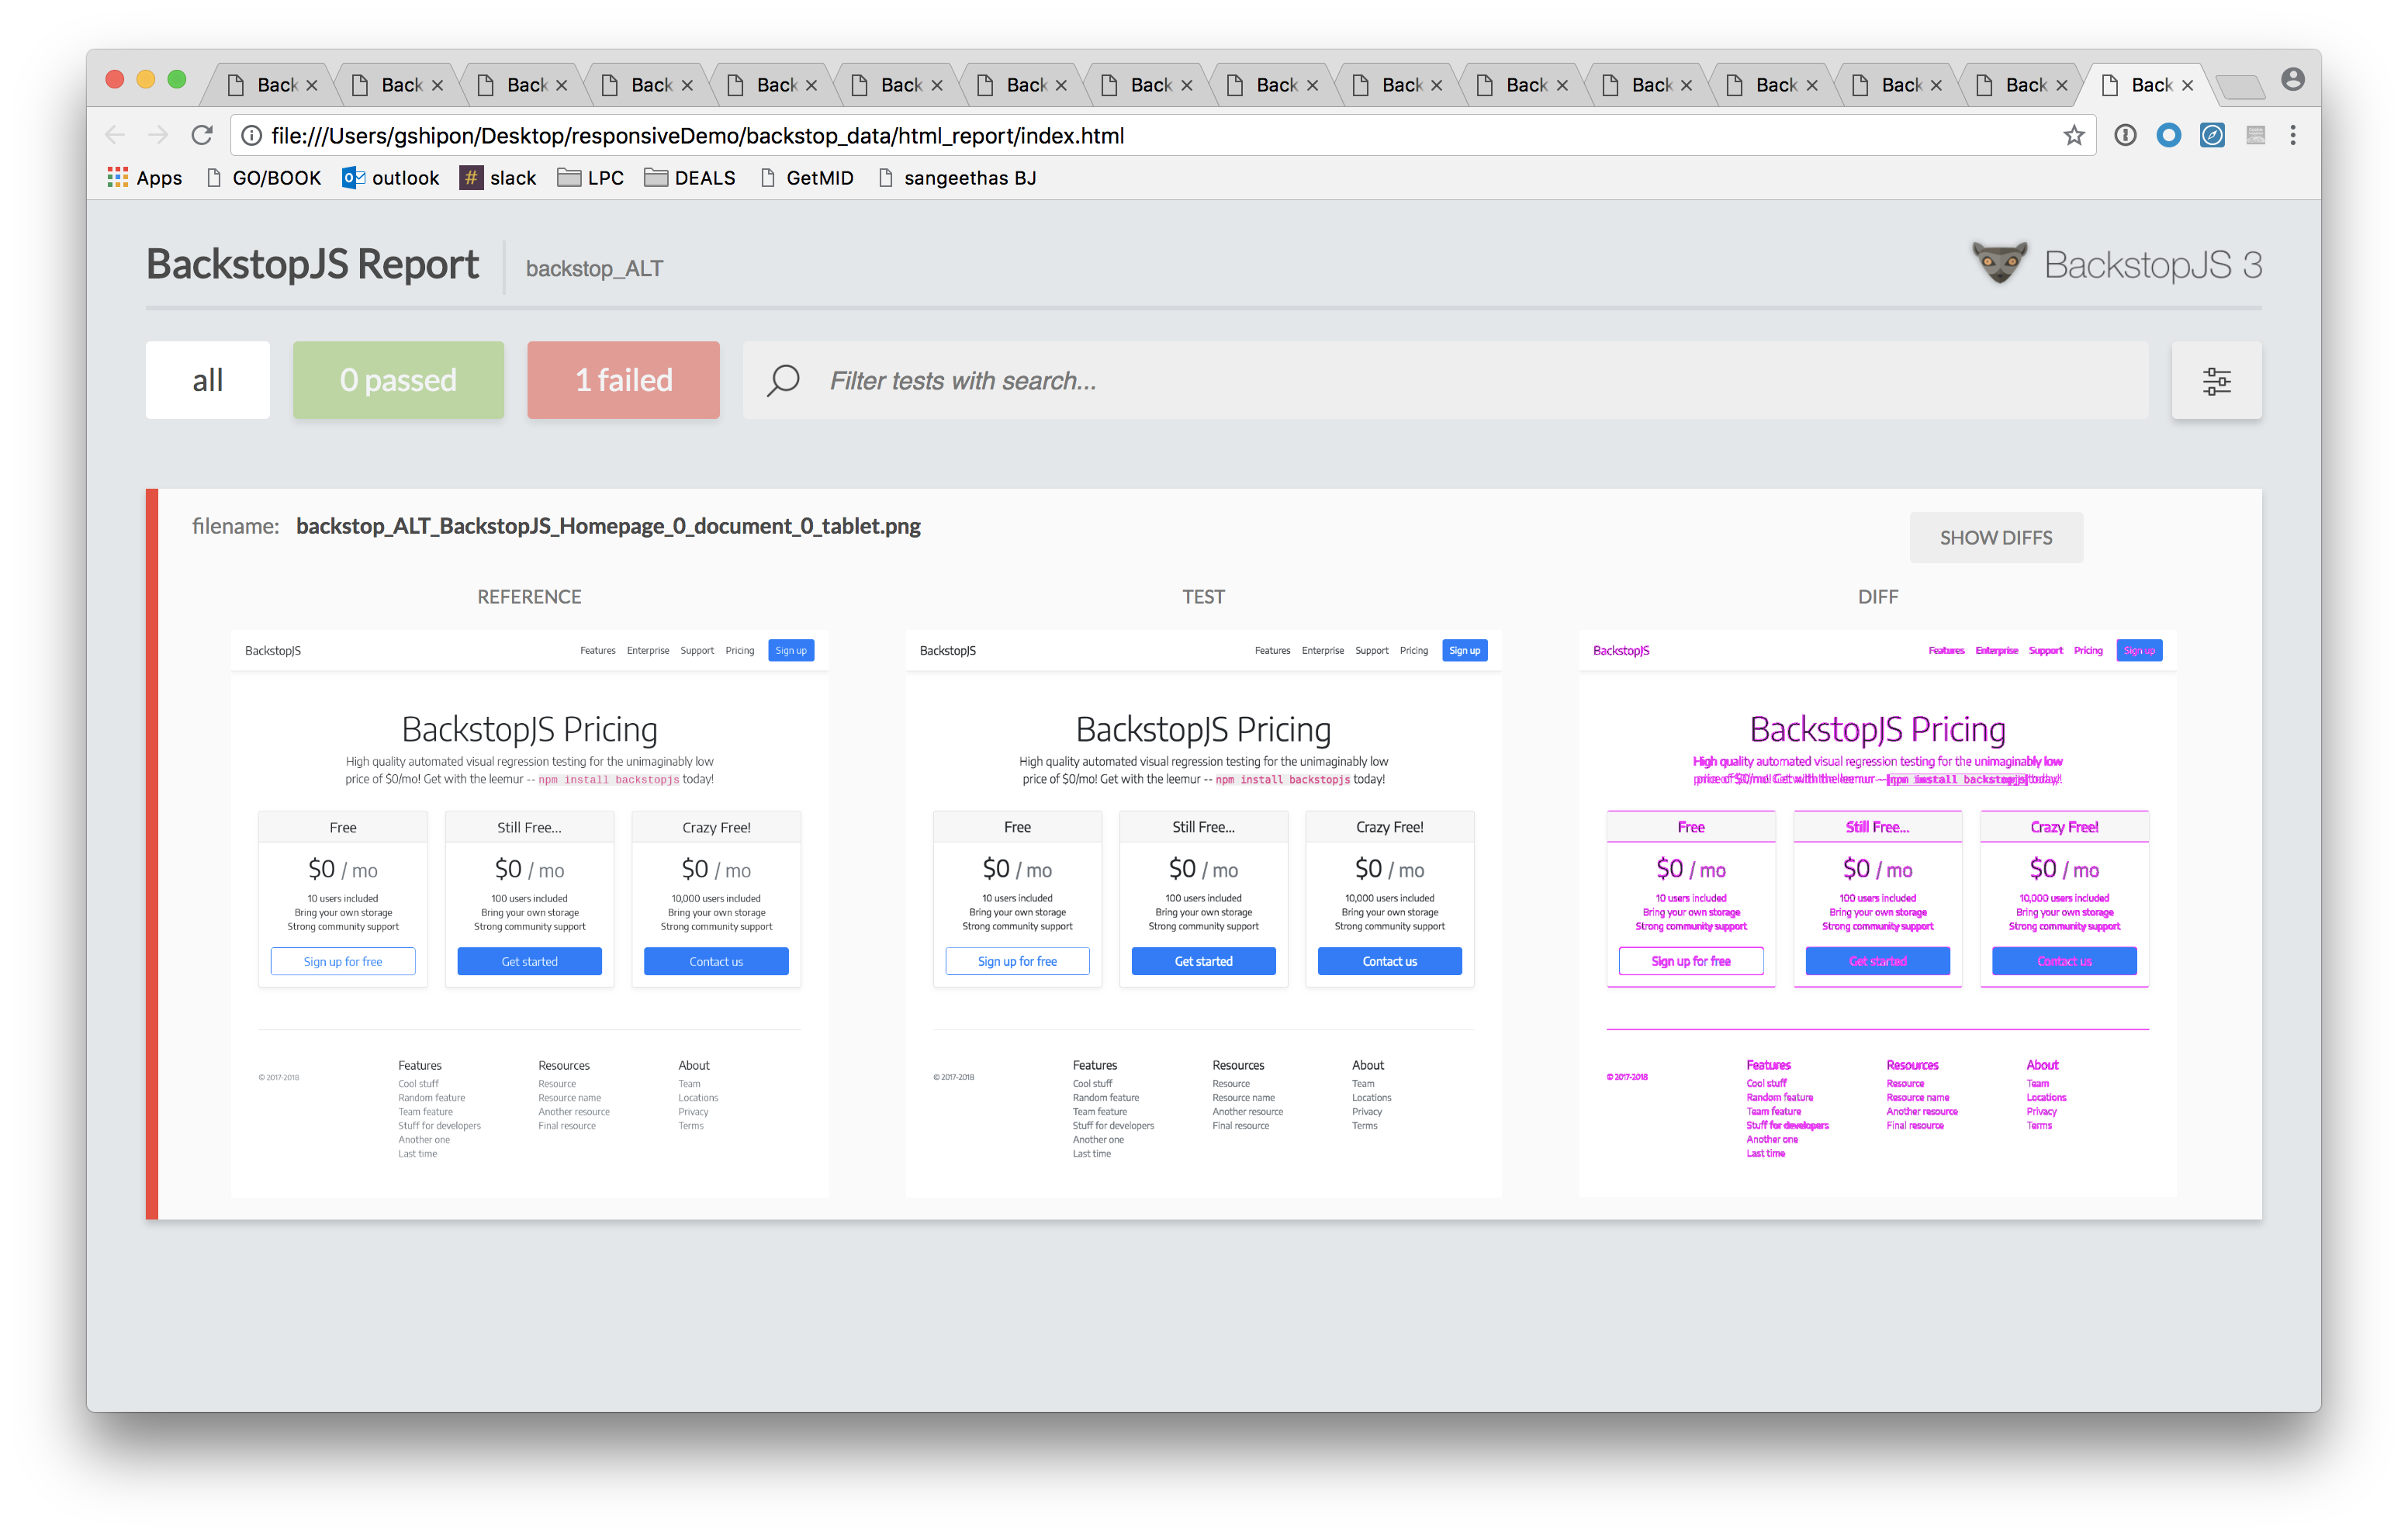
You can make this issue go away by rendering in a BackstopJS Docker container. Lucky for you we've made it incredibly easy to do.
First, go ahead and install docker on your machine from the Docker Downloads Page.
Make sure Docker is running on your machine. On MacOS there is a menu item that looks like this... 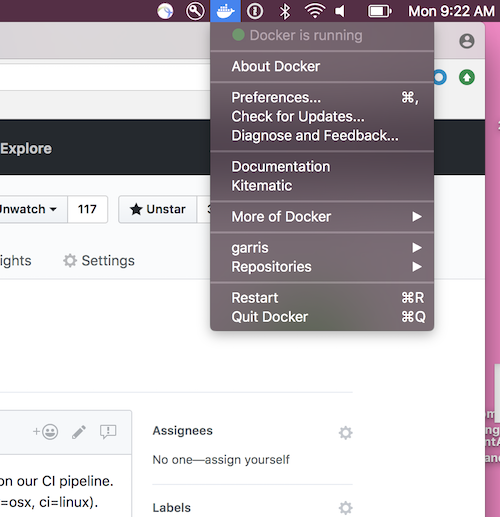
Then, simply add a --docker flag onto your commands. E.G...
- ```sh
- backstop test --docker
- ```
or for a local install
- ``` js
- const backstop = require('backstopjs');
- backstop('test', {docker: true});
- ```
The above flag will cause BackstopJS to hit your Docker local client, spin up a BackstopJS container from https://hub.docker.com/r/backstopjs/backstopjs/ and execute your test. By default, Backstop will attemt to use a Docker image with the same version number specified in your package.js.
Changing the default Docker command
If the default docker command or image does not work for you, you can customize the command to run BackstopJS with Docker by changing the dockerCommandTemplate config option. The default is:
- ```sh
- "dockerCommandTemplate": "docker run --rm -it --mount type=bind,source=\"{cwd}\",target=/src backstopjs/backstopjs:{version} {backstopCommand} {args}"
- ```
Tip: to run BackstopJS in Docker in an environment where the output is piped (e.g. CI server or an IDE's output window), remove the -t parameter (change the default to "docker run --rm -i --mount...)
Requirements for when you're using docker...
1) If you are using a config generated prior to version 3.5 and you get an error like this...
- ```
- COMMAND | Command "test" ended with an error after [0.312s]
- COMMAND | Error: Failed to launch chrome!
- ... Running as root without --no-sandbox is not supported. See https://crbug.com/638180.
- TROUBLESHOOTING: https://github.com/GoogleChrome/puppeteer/blob/master/docs/troubleshooting.md
- ```
then you need to add this to the root of your config...
- ``` js
- "engineOptions": {
- "args": ["--no-sandbox"]
- },
- ```
2) localhost won't work in your scenarios -- instead, mac and win users can use host.docker.internal e.g.
- ``` json
- "url": "https://host.docker.internal/?someCoolAppParameter=true"
- ```
Integration options (local install)
Installing BackstopJS locally to your project makes a few integration options available.
Using Backstop as a locally installed standalone app looks like this....
- ```sh
- # Install from your project root
- npm install backstopjs
- # Then, run commands by directly calling the cli
- ./node_modules/.bin/backstop test --config=<myConfigPath>
- ```
The more interesting case is calling backstop from another node app...
- ``` js
- const backstop = require('backstopjs');
- ```
Invoke default behavior in the current working directory context
- ``` js
- backstop('test')
- .then(() => {
- // test successful
- }).catch(() => {
- // test failed
- });
- ```
Pass options to the command
- ``` js
- backstop('test', {config:'custom/backstop/config.json'});
- ```
Pass a config object to the command
- ``` js
- // you can also pass a literal object
- backstop('test', {
- config: {
- id: "foo",
- scenarios: [
- //some scenarios here
- ]
- }
- });
- ```
The --filter argument still works too -- just pass a filter prop instead.
- ``` js
- // you can also pass a literal object
- backstop('test', {
- filter: 'someScenarioLabelAsRegExString',
- config: {
- id: "foo",
- scenarios: [
- //some scenarios here
- ]
- }
- });
- ```
Parse a config file explicitly
- ``` js
- backstop('test', {
- config: require("./backstop.config.js")({
- "foo": "bar"
- })
- });
- // Inside of `backstop.config.js` we export a function that returns the configuration object
- module.exports = options => {
- return {
- //you can access options.foo here
- }
- }
- ```
Since the backstop returns promises so it can run natively as a task in build systems like gulp
- ``` js
- const gulp = require('gulp');
- const backstop = require('backstopjs');
- gulp.task('backstop_reference', () => backstop('reference'));
- gulp.task('backstop_test', () => backstop('test'));
- ```
Using npm run scripts
- ``` json
- "scripts": {
- "approve": "backstop approve",
- "test": "backstop test",
- "init": "backstop init"
- }
- ```
The above is a basic example -- check out the NPM documentation for more info.
Tuning BackstopJS performance
During a test, BackstopJS processes image capture and image comparisons in parallel. You can adjust how much BackstopJS does at one time by changing
Capturing screens in parallel
By default, this value is limited to 10. This value can be adjusted as needed to increase/decrease the amount of RAM required during a test.
The example below would capture 5 screens at a time...
- ``` json
- asyncCaptureLimit 5
- ```
Comparing screens in parallel
By default, this value is limited to 50. This value can be adjusted as needed to increase/decrease the amount of RAM required during a test.
As a (very approximate) rule of thumb, BackstopJS will use 100MB RAM plus approximately 5 MB for each concurrent image comparison.
To adjust this value add the following to the root of your config...
- ``` json
- "asyncCompareLimit": 100
- // Would require 600MB to run tests. Your mileage most likely will vary ;)
- ```
Creating reference files
This Utility command will by default delete all existing screen references and create new ones based on the referenceUrl or url config config. It will not run any file comparisons.
Use this when you...
- create references from another environment (e.g. staging vs prod)
- or clean out your reference files and start fresh with all new reference
- or just create references without previewing
From your project directory...
- ```sh
- $ backstop reference
- ```
optional parameters
`--config=--i incremental flag -- use if you don't want BackstopJS to first delete all files in your reference directory
Modifying output settings of image-diffs
By specifying resembleOutputOptions in your backstop.json file you can modify the image-diffs transparency, errorcolor, etc. (See Resemble.js outputSettings for the full list.)
Instead of calling resemble`s ignoreAntialiasing(), you may set it as a property in the config. (See example)
Per default, Backstop uses Resemble's misMatchPercentage value. However, this value only detects mismatches above 0.01%. If you need more precision and want to use a misMatchThreshold below 0.01 (e.g. for large screenshots or small changes), you can set usePreciseMatching in the resembleOutputOptions. (See example)
- ``` json
- "resembleOutputOptions": {
- "errorColor": {
- "red": 255,
- "green": 0,
- "blue": 255
- },
- "errorType": "movement",
- "transparency": 0.3,
- "ignoreAntialiasing": true
- }
- ```
Git Integration
For most users, it can be helpful to keep a record of reference files over the long haul -- but saving multiple _test_ screenshots is probably overkill. So, just like checking-in your unit tests with your production code you can similarly check in your Backstop reference files with your production code.
For many users, adding these lines to your .gitignore or .git/info/exclude files will pare down your backstop files in a sensible way.
- ```
- backstop_data/html_report/
- bitmaps_test/
- ```
_Of course you can alternatively change your default config to save these files somewhere else out of the source control scope -- thats cool too._
Changing screenshot filename formats
One of the things Backstop does for you is manage all your screenshot files. Backstop uses a specific file-naming scheme to make this work. Changing this scheme is of course NOT RECOMMENDED. That said -- if you have an overwhelming need, then you can modify this behavior using the fileNameTemplate property. The default pattern is shown below where the labels in braces are replaced with internal values during runtime.
- ``` js
- {
- // ...
- fileNameTemplate: '{scenarioIndex}_{scenarioLabel}_{selectorIndex}_{selectorLabel}_{viewportIndex}_{viewportLabel}',
- // ...
- }
- ```
Developing, bug fixing, contributing...
First off, You are awesome! Thanks for your interest, time and hard work! Here are some tips...
We use eslint-config-semistandard.
Please run the linter before each submit, as follows. Thank you. 🙇🏽
- ```sh
- $ npm run lint -- --fix
- ```
HTML report development
Here's some suggestions if you want to work on the HTML report locally...
- The HTML front end is a React app. It lives in /compare/src/
- The workflow is as follows from the backstopjs root
- Start a remote server if you need to work with the approving tests flow
- ```
- cd test/configs/ && node ../../cli/index.js remote
- ```
- Open another shell and run a test with this...
- ```
- npm run sanity-test
- ```
- Your test report should display as designed.
- Then, make your UI changes and build with this...
- ```
- npm run build-and-copy-report-bundle
- ```
- No need to rerun a test, just refresh the browser window to view your UI changes.
- Repeat the process until you're done.
- When you are done, check it in and include the bundle as part of the checkin.
- 👆 NOTE: As a convenience, npm run build-and-copy-report-bundle copies your newly built React bundle into test/configs/backstop_data/html_report/ so you can then test your changes by simply refreshing your report in chrome.
Docker development
Want to make sure your changes work with the --docker option? You can rebuild your local docker image from your current BackstopJS source. From your BackstopJS root...
- ```sh
- npm run build-docker
- ```
If you have access to Docker Hub @backstop/backstop, then this command will push a new public BackstopJS docker image with the current version tag...
- ```sh
- npm run push-docker
- ```
SMOKE & FEATURE TESTS
See the next section for running the SMOKE TEST -- Please make sure this is working before submitting any PR's. Thanks!
- ```
- # From root directory
- # ---------------
- # simple test
- npm run sanity-test-docker
- # longer test covering many features
- npm run smoke-test-docker
- # Or another way to test...
- # From test/configs/ directory
- # ---------------
- # simple test
- ../../cli/index.js test --config=backstop --docker
- # longer test covering many features
- ../../cli/index.js test --config=backstop_features --docker
- ```
Troubleshooting
SANITY TEST: Does Backstop work in my environment?
Run the following command from your Desktop, home or project directory to check that Backstop will install and run in your environment. _Please make sure you have node version 8 or above. Windows users: Powershell is recommended._
- ```
- mkdir backstopSanityTest; cd backstopSanityTest; npm install backstopjs; ./node_modules/.bin/backstop init; ./node_modules/.bin/backstop test
- ```
Here is a sanity test which also uses docker...
- ```
- mkdir backstopSanityTest; cd backstopSanityTest; npm install backstopjs; ./node_modules/.bin/backstop init; ./node_modules/.bin/backstop test --docker
- ```
SMOKE TEST: Are backstop features working ok?
Run this command if you have made changes to the BackstopJS codebase and you want to make sure that you haven't broken anything.
- ```
- # from the backstopjs directory
- npm run smoke-test
- ```
Debugging
You have the option of displaying the Chrome window as tests are running. This will allow you to visually see your app state at the time of your test. To enable use...
- ``` json
- "debugWindow": true
- ```
When debugWindow is enabled on macOS, the system may show many firewall popups. This is because Puppeteer's Chromium application is not code-signed. As the exact steps to work around this may change with different macOS versions, see [[problem] Mac OS Firewall popup on every launch of puppeteer #4752](https://github.com/puppeteer/puppeteer/issues/4752) until this is fixed upstream. As of macOS Monterey 12.4, these steps are the most current to run.
For all engines there is also the debug setting. This enables verbose console output.This will also output your source payload to the terminal so you can make sure to check that the server is sending what you expect. 😉
- ``` json
- "debug": true
- ```
Issues with Chrome-Headless in Docker
Please keep in mind, Chrome-Headless will need a lot of memory. Take a look at these if you are seeing weird timeout errors with Docker...
https://github.com/garris/BackstopJS/issues/603#issuecomment-346478523
https://github.com/garris/BackstopJS/issues/537#issuecomment-339710797
Interaction: clicking a link that loads a new page
This is a grey area for BackstopJS. When you click a link to a new page inside of Chrome headless then you are unloading all your current app state and starting fresh with a new app state. If this is your case, the best practice is to simply create a new BackstopJS scenario with the required URL state etc. If you have some kind of situation which really requires this kind of behavior then it's doable -- take a look at this issue for inspiration... https://github.com/garris/BackstopJS/issues/657
Chrome Zombies!
Sometimes when developing scripts -- browser errors can actually cause Chrome-Headless to lose their special connection to each other. If you find that Chrome zombies are accumulating in your ENV spacetime continuum then please follow these steps:
1) DON’T PANIC!
2) Remain calm.
3) do the following...
MacOS and Linux users can run...
- ```
- pkill -f "(chrome)?(--headless)"
- ```
Windows users can run... (in PowerShell)
- ```
- Get-CimInstance Win32_Process -Filter "Name = 'chrome.exe' AND CommandLine LIKE '%--headless%'" | %{Stop-Process $_.ProcessId}
- ```
The dreaded: _command-not-found_ error...
Issues when installing
Sometimes bad permissions happen to good people. It's ok, this is a safe space. Hopefully this will help... https://github.com/garris/BackstopJS/issues/545
Projects don't work when I share with other users or run in different environments.
Be sure to use a config id in your config file. See https://github.com/garris/BackstopJS/issues/291
Tutorials, Extensions and more
- A cool overview article by Adrien Lemaire -- Overview of BackstopJS, a tool to test a web application’s UI
- Another by Adrien Lemaire Check this if you are interested in Continuous Integration (CI)! A journey in Continuous Integration Testing
- Angela Riggs is a pioneer in the Visual Testing space and leader in cultivating a culture of quality for software teams. Read about it here and here and listen to her talk here
- Check out Marc Dacanay's BackstopJS articles -- he has a great intro as well as some great in-depth tips.
- Here is a cool project template for static sites by Walmyr Filho @wlsf82 https://twitter.com/walmyrlimaesilv
- A really good one on refactoring CSS with BackstopJS by Hannes Käufler
- A Simple grunt-backstopjs plugin - For the Grunt enthusiasts
<!--
- (RECOMMENDED Updated for version 2) Regression testing with BackstopJS, in-depth tutorial by Angela Riggs http://www.metaltoad.com/blog/regression-testing-backstopjs
- Contents
- expect
- [The --filter argument still works too -- just pass a filter prop instead.](#the---filter-argument-still-works-too----just-pass-a-filter-prop-instead)
- [We use eslint-config-semistandard.](#we-use-eslint-config-semistandard)
- Credits
- A lovely article on Making Visual Regression Useful by Phillip Gourley
- Automated regression testing for AngularJS (and other) web-apps -- article on DWB
- Generate a BackstopJS configuration file from sitemap.xml with BackstopJS Scenarios Constructor by Enzo Sterro
- BackstopJS brochure at http://BackstopJS.org/.
-->
Credits
BackstopJS was created and is maintained by Garris Shipon
💙㊗️🙇 Many many thanks to all the contributors with special thanks to our BackstopJS core contributors...
- Brendon Barreto Massive code optimizations and house cleaning in 3.8.5.
- Gabe Gorelick tons of fixes and improvements with error handling and docker integrartion in v3.8.
- SengitU adding Scenario Specific Viewports in v3.5.9.
- Walmyr Filho for awesome articles and backstop-config.
- Benjamin Blackwood documentation improvements for our win-based brothers and sisters plus fixing a massive bug with our --docker implementation,
Justin Heideman better web-client report UI performance in version 3.5.3.
- Peter Krautzberger improved error handling, Vladislav Altanov and thumpmaster improving our screen capture compatibility, Mikkel Rom Engholm improvements to our scrubber modal, Xingxin Zeng makingexpect config property work, Andrew Taylor improvements to report opening -- version 3.2.
- Christopher Frank for Puppeteer integration!✨
- @KenCoder, @AkA84, @VesterDe, Vladislav Altanov, Alice Young for documentation, fixes, improved test hygene and support with 3.2 release
- Gabriele Mantovani for our beautiful new UI in 3.1.0.
- Pavel Zbytovský, Đinh Quang Trung, Dan Pettersson, anton-kulagin, Baltazardoung, kiran-redhat, lsuchanek, Michal Vyšinský, Leonid Makarov, Vladislav Dekov 3.0 post release fixes and features.
- Shinji Yamada for Chrome Headless & Chromy.JS integration support in 3.0.0.
- Shane McGraw for testing and awesomeness during 3.0 development.
- Steve Fischer, uğur mirza zeyrek, Sven Wütherich, Alex Bondarev for concurrency support, JS config passing, JPEG support, CLI Auth support.
- Klaus Bayrhammer for making BackstopJS a "requireable" node module in 2.3.1
- @JulienPradet, @onigoetz, @borys-rudenko, @ksushik, @dmitriyilchgmailcom, @Primajin for giving the world BackstopJS version 2.0!
- Suresh Kumar. M for selector expansion in 1.3.2
- Klaus Bayrhammer for all the incredible effort leading up to 1.0 -- the cli reports and compatibility fixes are awesome!
- Evan Lovely and Klaus Bayrhammer for help on the 0.9.0 release
- Robert O'Rourke for help on the 0.8.0 release
- Klaus Bayrhammer for help on the 0.7.0 release
- Benedikt Rötsch for help on the 0.6.0 release
- Yulia Tsareva for help on the 0.5.0 release -- windows support
- Lewis Nyman and Stoutie for help with 0.4.0 release -- you guys are responsible for really getting the ball rolling!
